User Manual
Overview
The Sarkar Tactical operations system runs on one Ubuntu server (the "Dell") and is accessed from any browser on the same network. You don't need to install anything — open the URL and go.
http://192.168.1.31:3001/Bookmark it. Works from any device on the same LAN as the Dell.
- Trim Calculator (/trim-calculator.html) — pick an order or assemble lines manually, get a full breakdown of trim required + a costing pass against current trim stock.
- Trim colour mapping — garment colour → trim colour rules now live on /trims.html (e.g. MTP vest → Olive Green trim). Trim sheets themselves are now colour-agnostic — the colour gets applied at calc time.
- Per-item trim-sheet linking — open any trim sheet → "+ Edit linked items" lets you pick which catalogue items use it without trekking through every item profile. The "Link sheets" button on catalogue items is now also visible on Helmet Accessories, Helmets, Public Order, EOD, and other soft-goods categories.
- Carrier job sheet — material override + Save as new fabric recipe. Each line lets you swap one material for another (e.g. switch a 3D mesh) and then bake the swap into a new recipe in one click.
- Helmet job sheet polish — pick a profile and it auto-loads (no Load button). Empty fields glow amber after a profile load. Send to Order now sits below the entries list as a big green CTA.
- Order page autosave — header fields save 1.5s after you stop typing. The 💾 Save button is still there to force-save and shows the "✓ Saved · just now" indicator next to it.
- Labels page — order refs are clickable; SAP serials can be allocated straight from an empty cell (no ballistic job sheet needed).
- Breadcrumb navigation — every non-dashboard page now shows the full path back to Home (e.g. Home › Trims › Trim Sheet) — click any crumb to jump back to that level.
The system is a dashboard (home page) of numbered tiles that link to specialised pages. Every non-dashboard page has a breadcrumb top-left (← Home › Section › This page) — click any link in the trail to jump back to that level.
Main workspaces
Three weights, three purposes
Every catalogue variant now carries three independent weight fields. They are not interchangeable:
- Fabric weight (
fabric_weight_kg) — non-trim fabric only (Cordura + Mesh + Lining / Riverseal). Sourced from CARRIER COST v2.xlsx. The "Krieger fabric weight = 0.76 kg" is this number — it does not include ballistics, trims, or packaging. - Net weight (
net_weight) — complete finished product without packaging. Includes fabric + trims + ballistic SAP + hardware. This is what goes on export declarations under "Net mass". - Gross weight (
gross_weight_kg) — complete product INCLUDING packaging (box, poly, labels, pallet wrap). Used on packing lists + commercial invoices.
net_weight, which was incorrect. On deploy, all 172 of those values were moved to fabric_weight_kg and net_weight was nulled so you can fill in the real totals. Data Audit now flags missing Net and Gross weights separately.What changed recently (Apr 2026)
- 4-digit PIN login for every user. See Signing in & users. Role-based landing pages (admin / sales / cutting / stock / user).
- Commercial Invoice & Packing List (CIPL) generator — two-page PDF with preview mode; fills in customer, items, ML rating, HS code and prices from the order automatically. See CIPL section.
- Labels grid at
/labels.html— print-tracking wall of every order × label-kind, with inline ticks, ALL-PRINTED button, and two PDF exports (Print queue / Printed log). See Labels. - Preview & download modals on every job-sheet generator (Carrier, Helmet, Ballistic, CIPL) — review + edit free-text before committing to the PDF.
- Ship to Plano checkbox on orders — auto-ticks for P-prefix refs, auto-fills Sanjay's consignee address on the CIPL.
- Licence number field on orders (ECJU SIEL / OGL) — flows onto CIPL automatically.
- Warranty period on catalogue items — integer months + optional notes, displayed on the item profile.
- Size-uplift % on fabric recipes — if a recipe only goes up to 2XL but an order needs 3XL, the system adds a “one size up” percentage (e.g. +5% per step) so the fabric estimate scales sensibly.
- Serial pools manager on
/serials.html— add / rename / archive custom 3-letter types (DET, EOD, ECR, …). Custom-serial insert per order. - Catalogue inline ✎ rename on category / subcategory / item names; zero-stock variant delete in the Inventory drawer.
- Hourly USB backups with rolling retention (48 hourly + 14 daily + 12 monthly). Public URL via Cloudflare Quick Tunnel — see Hosting.
- Mobile view overhaul — full reflow, full-screen dialogs on phones, tap-target-friendly buttons. See Mobile view.
- Cutting Patterns → Fabric Recipes. The page at
/pattern-sheets.htmlis now labelled "Fabric Recipes". Same underlying table, better name. - Ballistic Costs — 776 rows imported from Ballistic Costs.xlsx. Shows up as a new card on every ballistic catalogue item plus a per-recipe editor on the Ballistic Recipes page.
- Auto-generated helmet serials — pick a Job Number on the Helmet Job Sheet and every entry gets its serial assigned automatically.
- File attachments on orders — upload PDFs, Word docs, or images directly to an order.
- Item Copy / Merge + duplicate resolver — fold brochure imports into your existing items without losing HS codes.
- Material & supplier merge tools — kill duplicates without orphaning stock or recipe links.
Glossary
Plain-English definitions for the acronyms and trade terms used throughout the rest of the manual. Keep this page open in a second tab the first few weeks — everything else assumes you know what a SKU or a CIPL is.
System & data terms
- Catalogue
- The master list of every product the system knows about, broken down by Category → Item → Variant.
- Item
- One named product, regardless of size or colour (e.g. “Bellator”). Several SKUs roll up to one item.
- SKU
- Stock Keeping Unit — one specific size + colour + variant combination of a product. “Bellator · Large · Black” is one SKU; “Bellator · Large · Tan” is a different SKU.
- Variant
- A specific size + colour combo under an item. One variant = one SKU.
- Job ref
- The system’s order reference, e.g.
G26-019orP26-014. G = Glasgow despatch, P = Plano (USA) despatch. Allocated when an order is finalised. - PIN
- 4-digit number used to sign in. Every record you create or edit is tagged with your name automatically.
- Allocation
- Earmarking specific stock units (or serial numbers) to a particular order so they can’t be used for anything else.
- Serial pool
- A named group of serial numbers — either the default pool or a custom 3-letter pool like DET (Detonator), EOD (Explosive Ordnance Disposal), ECR (Explosive Cord Reel).
Products & materials
- Carrier
- A vest designed to hold ballistic plates (e.g. Bellator, GPV). Catalogue category. Different from soft-armour vests.
- Vest
- A soft-armour body-protection garment without rigid plate pockets (e.g. CTV, BFV). Catalogue category.
- SAP
- Soft Armour Panel — flexible ballistic protection that fits inside a carrier pocket.
- HAP
- Hard Armour Plate — a rigid ballistic plate (ceramic, steel, or PE) for higher protection levels. HAP LVL3 and HAP LVL4 are catalogue categories.
- BOM
- Bill of Materials — the list of every fabric, ballistic and trim item that goes into making one finished product.
- Trim
- All the non-fabric hardware on a carrier or vest: webbing, hook/loop, buckles, zips, elastic, bungee cord, triglides, ladderlocks.
- Trim sheet
- A reusable BOM template that lists every piece of trim a product needs. One trim sheet can be linked to multiple catalogue items.
- Cordura
- A heavy-duty woven nylon fabric — the main outer material on most carriers.
- MOLLE
- A standard pattern of horizontal webbing loops on the outside of a vest for attaching pouches and accessories.
- ROC buckle
- A quick-release buckle used on shoulder and waist straps. ROC40 / ROC80 refer to width variants.
- MTP / Multicam
- Multi-Terrain Pattern (UK military camo) and Multicam (US-style camo). Per Sarkar convention, both garment colours map to Olive Green trim.
Export compliance
- CIPL
- Commercial Invoice + Packing List — the two-page export document that ships with every international order. Generated as a single PDF from
/cipl.html. - ECJU
- Export Control Joint Unit — the UK government body that issues export licences.
- SIEL
- Standard Individual Export Licence — a UK export licence for a specific consignee + product, issued by ECJU. The standing US/Plano SIEL covers multiple shipments.
- OGL
- Open General Licence — covers low-risk exports to certain destinations without needing a per-shipment licence.
- HS code
- Harmonised System code — the international customs code that tells border control what the goods are. Body-armour carriers typically use
62113310. - ML rating
- Military List rating — the UK classification for defence goods (e.g.
ML13d1= body armour,ML13d2= helmets,ML13c1= ballistic helmet shells). - Plano
- Sarkar Tactical Inc’s US depot in Plano, Texas. Orders going there ride the standing US/Plano SIEL. Order job refs are prefixed with P.
Logistics
- PCS / CTN
- Pieces per carton — used on packing lists to show how many units in each box.
- MOQ
- Minimum Order Quantity — the smallest qty a supplier will sell of a given material.
- Net weight
- The finished product without packaging. Goes on the customs declaration.
- Gross weight
- The product including packaging (box, poly, labels, pallet wrap). Goes on the packing list.
- Fabric weight
- Just the cloth: Cordura outer + mesh + lining. No plates, no buckles, no packaging. Used as the base figure for fabric-cost calculations.
Icon legend
Every page uses the same handful of icons for the same kinds of actions. If you see one you don’t recognise, the meaning lives here.
| Icon | Means |
|---|---|
| ✎ | Edit — open a form to change the values on this row / item. |
| ⧉ | Duplicate — make a copy of this row right below it. |
| ✕ | Remove — delete this row (with a confirmation prompt for destructive ones). |
| ↔ | Swap / merge / move — switch one thing for another. |
| 🔄 | Swap to a different item / refresh — same idea as ↑ in a different shape. |
| ↗ | Opens in a new tab — usually a side-trip to a related page. |
| ↻ | Reload / refresh — fetch the latest from the server. |
| ⊕ + | Add a new row / item / section. |
| ⚙️ | Settings / manage — admin actions on the page itself (rename categories, manage users, etc.). |
| 🧵 | Link to a trim sheet (the thread icon). |
| ★ | Saved / favourite / starred — or, on the trim calculator, a value that’s been temporarily overridden. |
| 📥 📤 | Goods In (incoming) and Goods Out (outgoing) on the deliveries log. |
| 📦 | Deliveries / packing / shipping context. |
| ⚠️ ⚠ | Warning — read the message; you probably need to do something. |
| 📋 | A trim sheet / template. |
| 💾 📂 | Save (write to server) and Load (open a previously saved item). |
The kbd style is used for buttons you can click (e.g. Save, + New order) and keyboard keys (e.g. Enter, ⇧). When you see one in the manual, look for a button or key with that label on the page.
Signing in & users
Every non-public page is now gated by a 4-digit PIN. If you open the system and get bounced to /login.html, that's working as intended — type your PIN.
Active users
- Admin: Alex (4821), Stephen (6187), Matt (8459).
- Sales: Raissa (9032), Sam (3206) — lands on Sales Station.
- Cutting: David (7394), Dylan (1568) — lands on Material Cutting Station.
- Stock: Gary (2745) — lands on Warehouse Station.
- User (full access, no admin UI): Liz (5273), Thea (8041).
Role determines which pages the navigation exposes. Roles are not enforced server-side yet — any signed-in user can hit the API directly if they know the URL. That hardening is on the roadmap.
Managing users (admin only)
Admins: open /users.html. You can add new users, change names, reset PINs, change roles, or archive departing staff. Every stock / order / serial event records the signed-in user automatically — the old "employee" dropdown in the header has been replaced by your own identity.
Dashboard & header
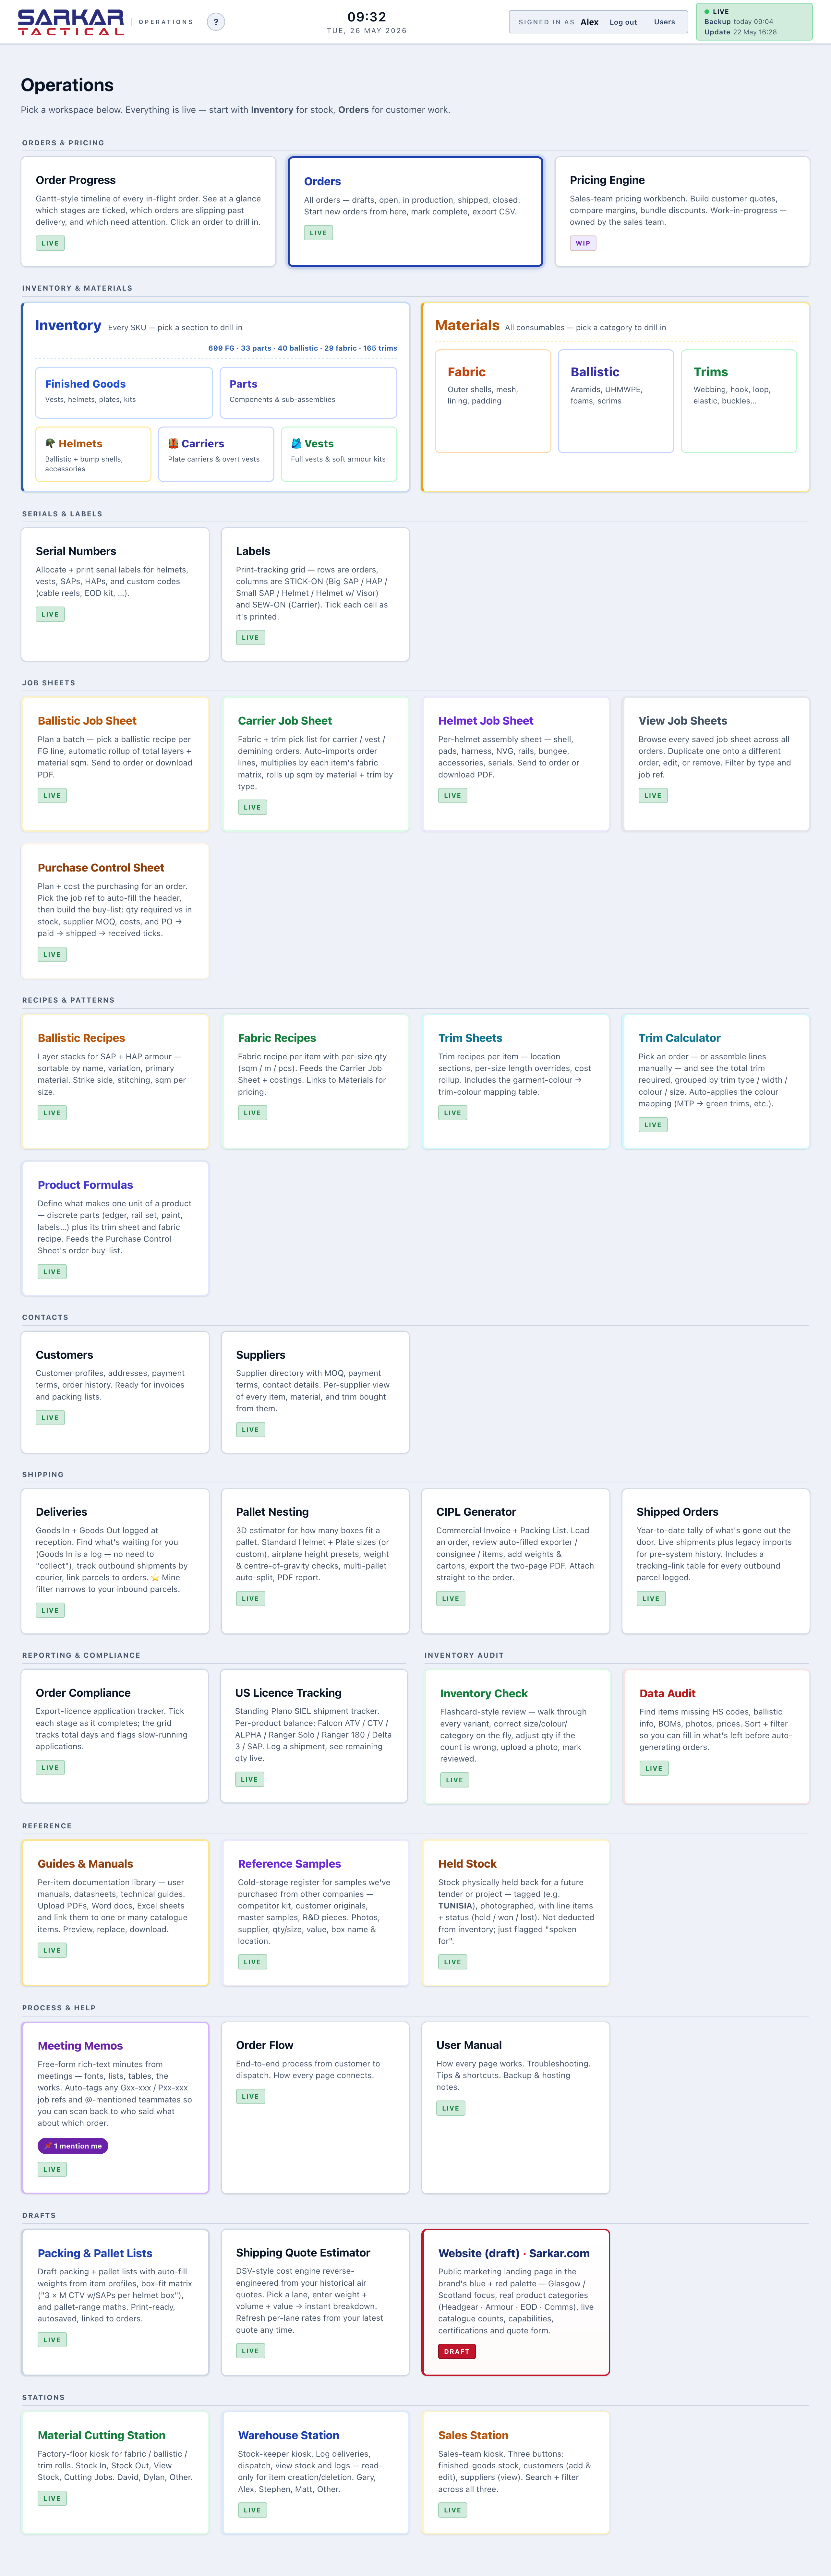
Every page in the system shares the same header with:
- Logo (left) — always clickable to return to the dashboard.
- ← Dashboard button — also returns home.
- Clock (centre) — server/device time.
- User pill (right) — shows who's signed in. The identity is locked by your PIN; every record you create or edit is tagged with your name automatically.
- Live status pill — database connection + last backup time. Green = all good. Amber = backup is stale. Red = database unreachable.
The dashboard itself is a grid of numbered tiles grouped into Catalogue & Inventory, Orders, Job Sheets, Recipes, Contacts, Stations, and Reference & Reporting. Tiles are numbered 01–13 so you can reference them unambiguously in conversations.
Mobile view
The site is usable on any phone or tablet. The layout reflows automatically at two screen sizes:
- ≤ 900 px (tablets / small laptops): spacing tightens, headings shrink slightly, form columns narrow.
- ≤ 640 px (phones): the full reflow — header stacks, clock drops below, page-action buttons stretch to full width (each ≥ 40 px tall for fingers), every form collapses to a single column, dialogs become full-screen sheets instead of tiny modals, input font bumps to 15 px so iOS stops auto-zooming when you tap a field, tables get a subtle gradient hint along the edges when they overflow (swipe to scroll).
- ≤ 380 px (small phones): the user pill in the header hides itself to save a row — you can still change user from Users or the login page.
Big tables (Inventory, Order lines, Labels grid) stay wide — you swipe horizontally to see the whole table. This is deliberate: compressing an eight-column grid to one column turns it into an unreadable stack of labels.
Inventory /stock.html
What this is for: keeping count of what’s physically in the building right now. Anything that arrives gets logged in Stock In; anything leaving gets logged in Stock Out; the Everything tab shows the running balance across catalogue items, materials and trims in one view.
The page is called “Inventory” on the dashboard but the URL is the older /stock.html — same page either way.
- Log incoming goods: open Stock In → pick the item from the catalogue dropdown → enter qty + batch + PO ref → Save.
- Log outgoing goods: open Stock Out → pick item + qty + job/order ref (use
ZERO-OUTfor write-offs). The running balance updates immediately. - Check what’s on hand: the Dashboard tab groups by category — click any item row to open the product drawer.
- Find a specific item: the search box at the top of every tab matches category, item, code and batch.
- Drag-and-drop a product photo: click any item row → drop image(s) anywhere on the Images card. Same photos appear on the Catalogue item profile.
What's on the page
- Everything tab (default) — unified view across catalogue items, materials, and trims with kind chips to filter.
- Dashboard tab — live SKU stock levels grouped by category and item with a quick search.
- Stock In / Stock Out — log incoming or outgoing goods with batch, PO, employee. Stock Out needs a job/order reference (or
ZERO-OUTfor write-offs). - Materials — metre-based raw materials (fabric rolls, ballistic materials). Per-roll batches with a usage log separate from SKU stock.
- Full Log — every movement across SKUs and materials in one unified list. Click a row to edit; every edit is audit-logged.
Photos, drag & drop
Click an item on the Dashboard tab or Everything tab to open its product drawer. The Images card accepts drag-and-drop of one or more photos — drop them anywhere on the gallery area. Click a thumbnail to open the full-size viewer with ← → arrows to step through the gallery. Same photos are visible on the catalogue item page.
backend/uploads/item-images/ on the Dell.Catalogue /catalogue.html
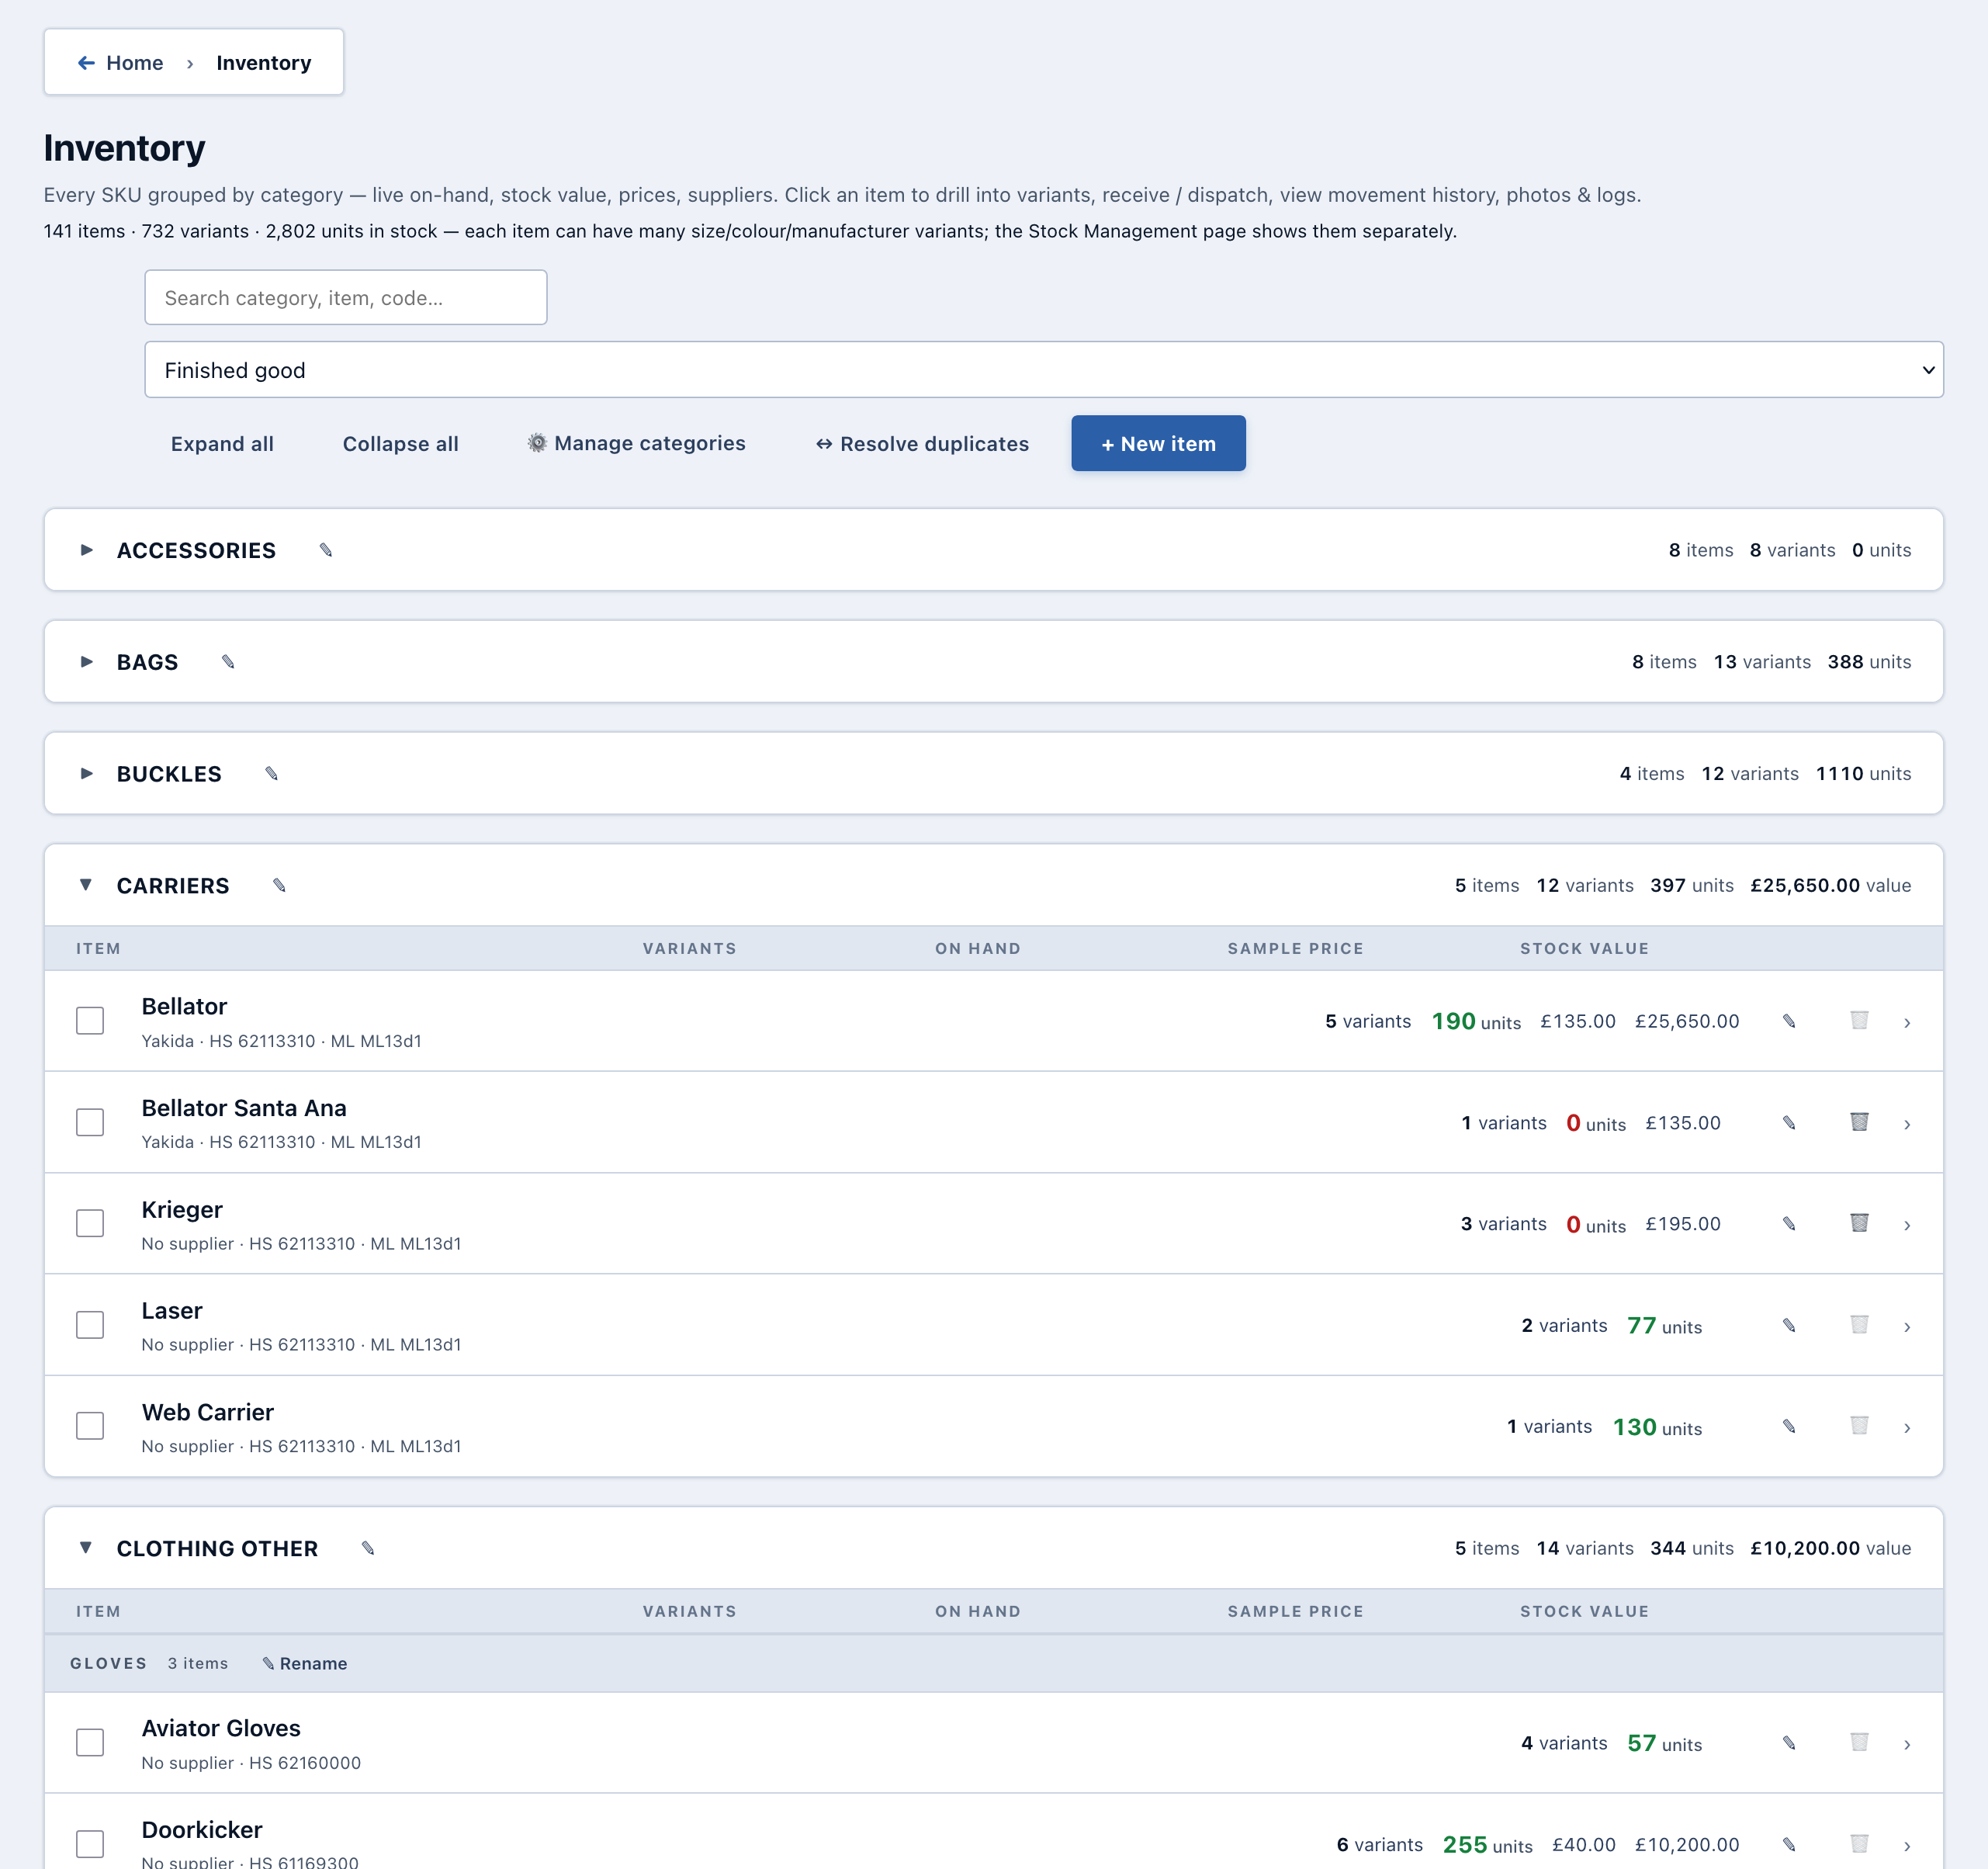
What this is for: the master list of every product the system knows about. Think of it as the menu of “what can we sell or build?” Open this to add a new product, fix a typo, or check which size + colour variants of an item exist.
Every SKU in the system, grouped by category. Categories collapsed by default.
Using the page
- Search — matches category, item, code. Tree auto-expands when typing.
- Expand all / Collapse all — bulk toggles.
- Filters — finished goods, materials (parts), quarantine.
- ⚙️ Manage — rename / delete categories and subcategories.
- ↔ Resolve duplicates — opens the duplicate resolver (see below).
- + New item — cascading dropdowns: Category → Item → Size → Colour. Any dropdown has a + Custom… option that switches to free text.
- Tick the checkboxes on rows to bulk-move items to a new category/subcategory.
Resolve duplicates (catalogue-merge.html)
Click ↔ Resolve duplicates in the Catalogue header. The page groups items with similar names (e.g. “Bellator” vs “Bellator Plate Carrier”) so you can merge them. For each group:
- Click a card to mark it the KEEP target (blue border).
- Shift-click the other card to mark it the MERGE-FROM source (orange border).
- Hit Merge source → target. Short/long descriptions and the ballistic flag copy onto every variant of the target; the source is archived.
Tick “Only groups where one side has a description” at the top to focus on the brochure-import pairs where it actually matters. Skip non-pairs with Skip group.
Item detail page /catalogue-item.html
What this is for: everything about one specific product — its variants, photos, weights, recipe (what materials go into it), and history. Open from the Catalogue list, or via the “Open item” link on any order line.
Drill-down for one item (all its size/colour/variant rows). Top-right actions: ✎ Edit item, 🧵 Link sheets, ↔ Copy / Merge, Open in Stock Manager, Delete item.
Sections on the page
- Photos — drag & drop onto the grid, or click + Upload. Up to 12 files per drop, 15 MB each. Click a thumbnail to open the full-screen lightbox viewer (← → to navigate, Esc to close, 🗑 to delete with confirmation).
- Stock — per-variant stock on hand.
- Ballistic — only for ballistic items. Lists the preferred SAP recipe + alternates, and the per-size ballistic sqm / layer value.
- Ballistic costs — per SAP recipe × this item × each size (sqm / kg / £). See Ballistic costs below.
- Bill of Materials — the finished good's parts. Edit via ✎ Edit item.
- Usage & cost — unified per-size materials + trims consumption with live price × qty rollup.
- Notes, Variants, and an Activity log colour-coded for stock in/out.
🧵 Link sheets
Opens a dialog to link one Trim Sheet and one Fabric Recipe to this item. The link applies to every variant of the item. These links feed the Carrier Job Sheet rollups.
Copy / Merge items
On any catalogue item page, click ↔ Copy / Merge. Use this to fold a newly imported item into an existing one (e.g. the brochure item "CTV Covert Tactical Vest" has a description, but your existing "CTV" has the HS code).
Flow
- Pick the other item by typing in the search box.
- Pick direction:
- Copy other → this (default) — the page you're on survives; it absorbs fields from the other.
- Copy this → other — the other survives; push this item's fields into it.
- Pick fields. Grouped into Descriptions, Classification (subcategory, HS code, ML, ballistic flag), Supplier & pricing (supplier, sales price, mfg cost, net weight, item code, manufacturer), and Recipe links (trim sheet, fabric recipe, SAP sqm per layer, ballistic front/back sqm, serial pool override, also-sellable flag). The "obvious" ones are pre-ticked.
- Optional: tick Archive the LOSER to soft-delete the side that's not kept.
- Hit Run.
Orders /orders.html
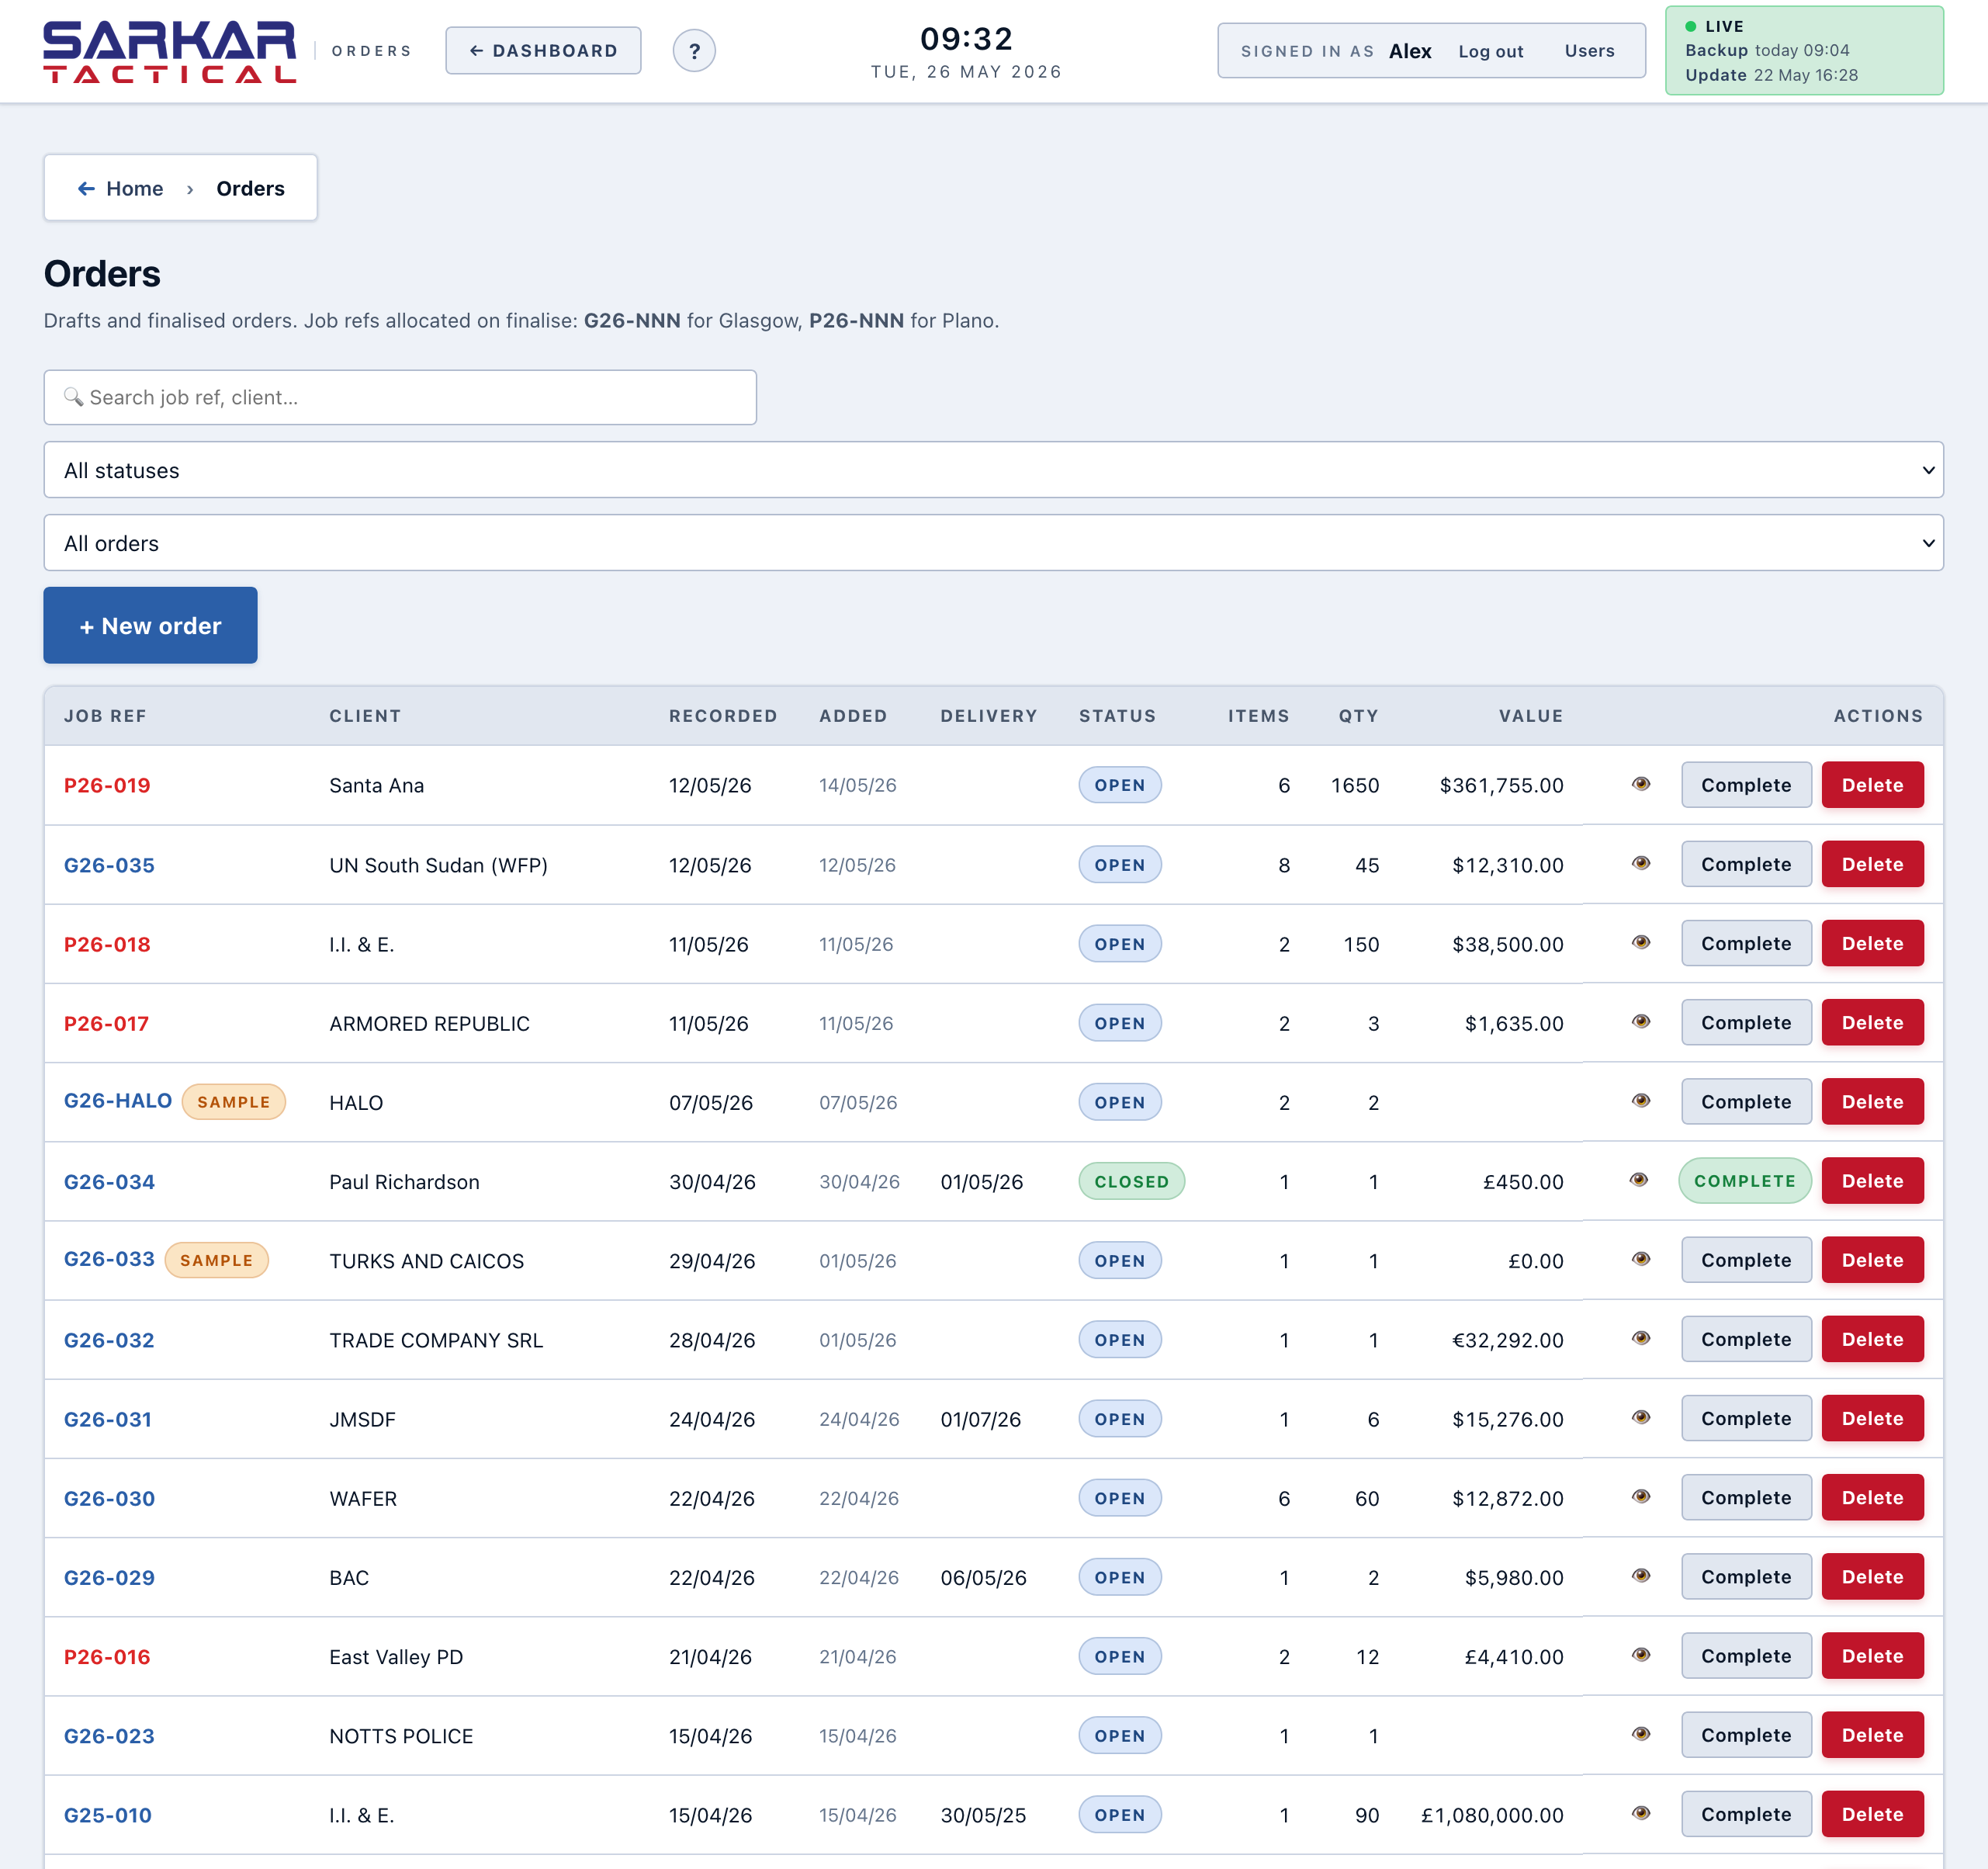
What this is for: every customer order the business is working on, from the moment it’s first received through to being shipped. Come here to create a new order, edit an existing one, or jump out to the paperwork (CIPL, job sheets, labels).
All customer orders, both drafts and finalised, live in one list — tick the filter chips to scope.
- Take a new order: click + New order → fill in customer + line items → click Save draft. The job ref (e.g. G26-019) is allocated when you click Finalise, not before.
- Edit an existing order: click the row to open it → header fields autosave 1.5 s after you stop typing → line items save when you click Save items.
- Generate the commercial invoice: open the order → click 📄 CIPL → review on screen → Preview & download PDFs.
- Log a delivery against this order: open the order → click + Log a parcel → fill courier + tracking + photo if useful.
- Find an old order: search bar at the top of the list matches job ref, customer name, and items.
Creating an order
- Click + New order.
- Fill in header (customer, delivery date, currency, Incoterms, payment terms, export licence tick box, licence number, Ship to Plano).
- Add line items. The picker has a qty input right next to the search box — type "5", pick the item, and the line is pushed with qty 5 already set. Click + New item to create a brand-new SKU inline (Category → Subcategory → Item cascading filters with a £/$/€ currency picker).
- Size / colour are free-text — pick from the catalogue's known values or type anything new (3X-Large, 4XL, one-off colours). Qty + price edits no longer lose focus mid-typing.
- Tick "Inc ballistics" for any line that should appear on the Ballistic Job Sheet.
- Save draft to keep it parked. Drafts don't burn job refs.
Ship to Plano + Licence number
- Ship to Plano — auto-ticked for new drafts whose job ref starts with
P. When ticked, the CIPL generator swaps the consignee block to Sarkar Tactical Inc's Plano warehouse (Sanjay Sood, 542 Haggard St) and sets destination to United States. Untick if you need a bespoke consignee for a P-prefix order. - Licence number — ECJU SIEL / OGL reference. Flows straight onto the CIPL's Compliance block. Leave blank for domestic / sample orders.
Job references
Format {G|P}{YY}-{NNN}: G for Glasgow, P for Plano, year, 3-digit sequence. The Job Number dropdown offers next-available refs for both series plus "Other (manual entry)" for back-fills.
Attachments (job sheets + uploaded files)
The "Attached job sheets & documents" card on an open order supports two kinds of attachments:
- Generated sheets — Ballistic / Helmet / Carrier job sheets "Sent to Order" become JSON snapshots here and can be re-rendered to PDF any time.
- Uploaded files — click + Upload file to attach a PDF, Word doc, Excel file, .txt, or image (max 30 MB). The file is served from
/uploads/order-attachments/and is visible as a clickable📎 filenamelink in the table. Deleting the row also wipes the file from disk.
Order log
Every attachment add/remove, status change, serial allocation, and user-added note appends to the order_log and shows on the order page. Type a note and click + Note to record free-text events (e.g. phone calls, customer decisions).
Header autosave
Header form fields (customer, ship-to, dates, notes, etc.) save themselves silently 1.5 seconds after you stop editing. The 💾 Save button stays as a force-save and as a status anchor — the small "✓ Saved · just now" hint next to it tells you when the last autosave landed (decays to "X s ago" / "X m ago"). First save of a brand-new draft still needs the manual click (creates the order); after that, autosave kicks in.
Labels card on the order page
The 🏷️ Labels card lists each cell with its tick state. Two new actions per row:
- ✎ Edit opens the labels grid pre-filtered to this order with the cell dialog auto-opened — change category, edit serials, add manual labels, etc.
- 📄 Print labels PDF in the card head deep-links to the labels grid pre-filtered, with the print-queue PDF auto-triggered as soon as it loads.
Customers /customers.html
Directory of every customer with contact info, currency, Incoterms, payment terms, address, and a count of their orders.
Delete vs archive
The Delete button attempts a hard delete. If the customer has any orders on file, the database’s foreign-key constraint blocks the delete and the backend falls back to archiving (sets is_active = 0). A yellow toast tells you when that fallback kicked in so the order history stays linked.
Click a row to open the customer detail view — summary + full orders list + totals.
Suppliers /suppliers.html
Directory of every supplier with name, contact, payment terms, MOQ notes, and categorisation tags.
Tags
Multiple tags per supplier (e.g. "Helmets" + "Ballistics"). Click tag chips at the top to filter. The supplier edit dialog's Tag field is autocomplete — type to match existing, or press Enter to create new.
Merge / move items
Click a supplier, then ↔ Merge / move items. Two modes:
- Select specific rows — tick catalogue items / materials / trims on the detail page, then hit Merge. Only those rows re-point to the chosen destination supplier.
- Leave everything unticked — the dialog becomes a full-merge: every catalogue item, material, trim, and order pointing at this supplier is re-pointed; tags merge; source is archived (or hard-deleted if you tick “Hard-delete source”).
Materials /materials.html
What this is for: the raw materials the factory cuts and sews into finished products — fabrics, ballistic panels, foam, lining. Each material is tracked by metre with separate per-roll batches so you know which roll was used on which job.
Each row carries supplier, unit price, HS code and ML rating. Trims (webbing, hook/loop, buckles) live on the separate Trims Stock page.
View switcher
Three big buttons at the top of the page: Ballistics, Fabric, Trims, All types. They filter the table (or, for Trims, jump to the dedicated page). The counts on each button update live.
Merge duplicate materials
Click into a material, then ↔ Merge into another. The dialog first shows a breakdown of what references this material: stock-in rows, usage rows, cutting-job lines, SAP recipe layers, legacy item_fabric cells, modern item_usage rows, and any fabric recipes (pattern_sheets) that name it in their JSON — with the recipe names listed so you can sanity-check. Pick the target, choose Archive (reversible) or Hard-delete (fails back to archive if FK-blocked), and run. Every reference re-points; fabric recipes that end up with two lines for the merged material collapse into one with summed per-size qtys.
Trim Sheets /trims.html
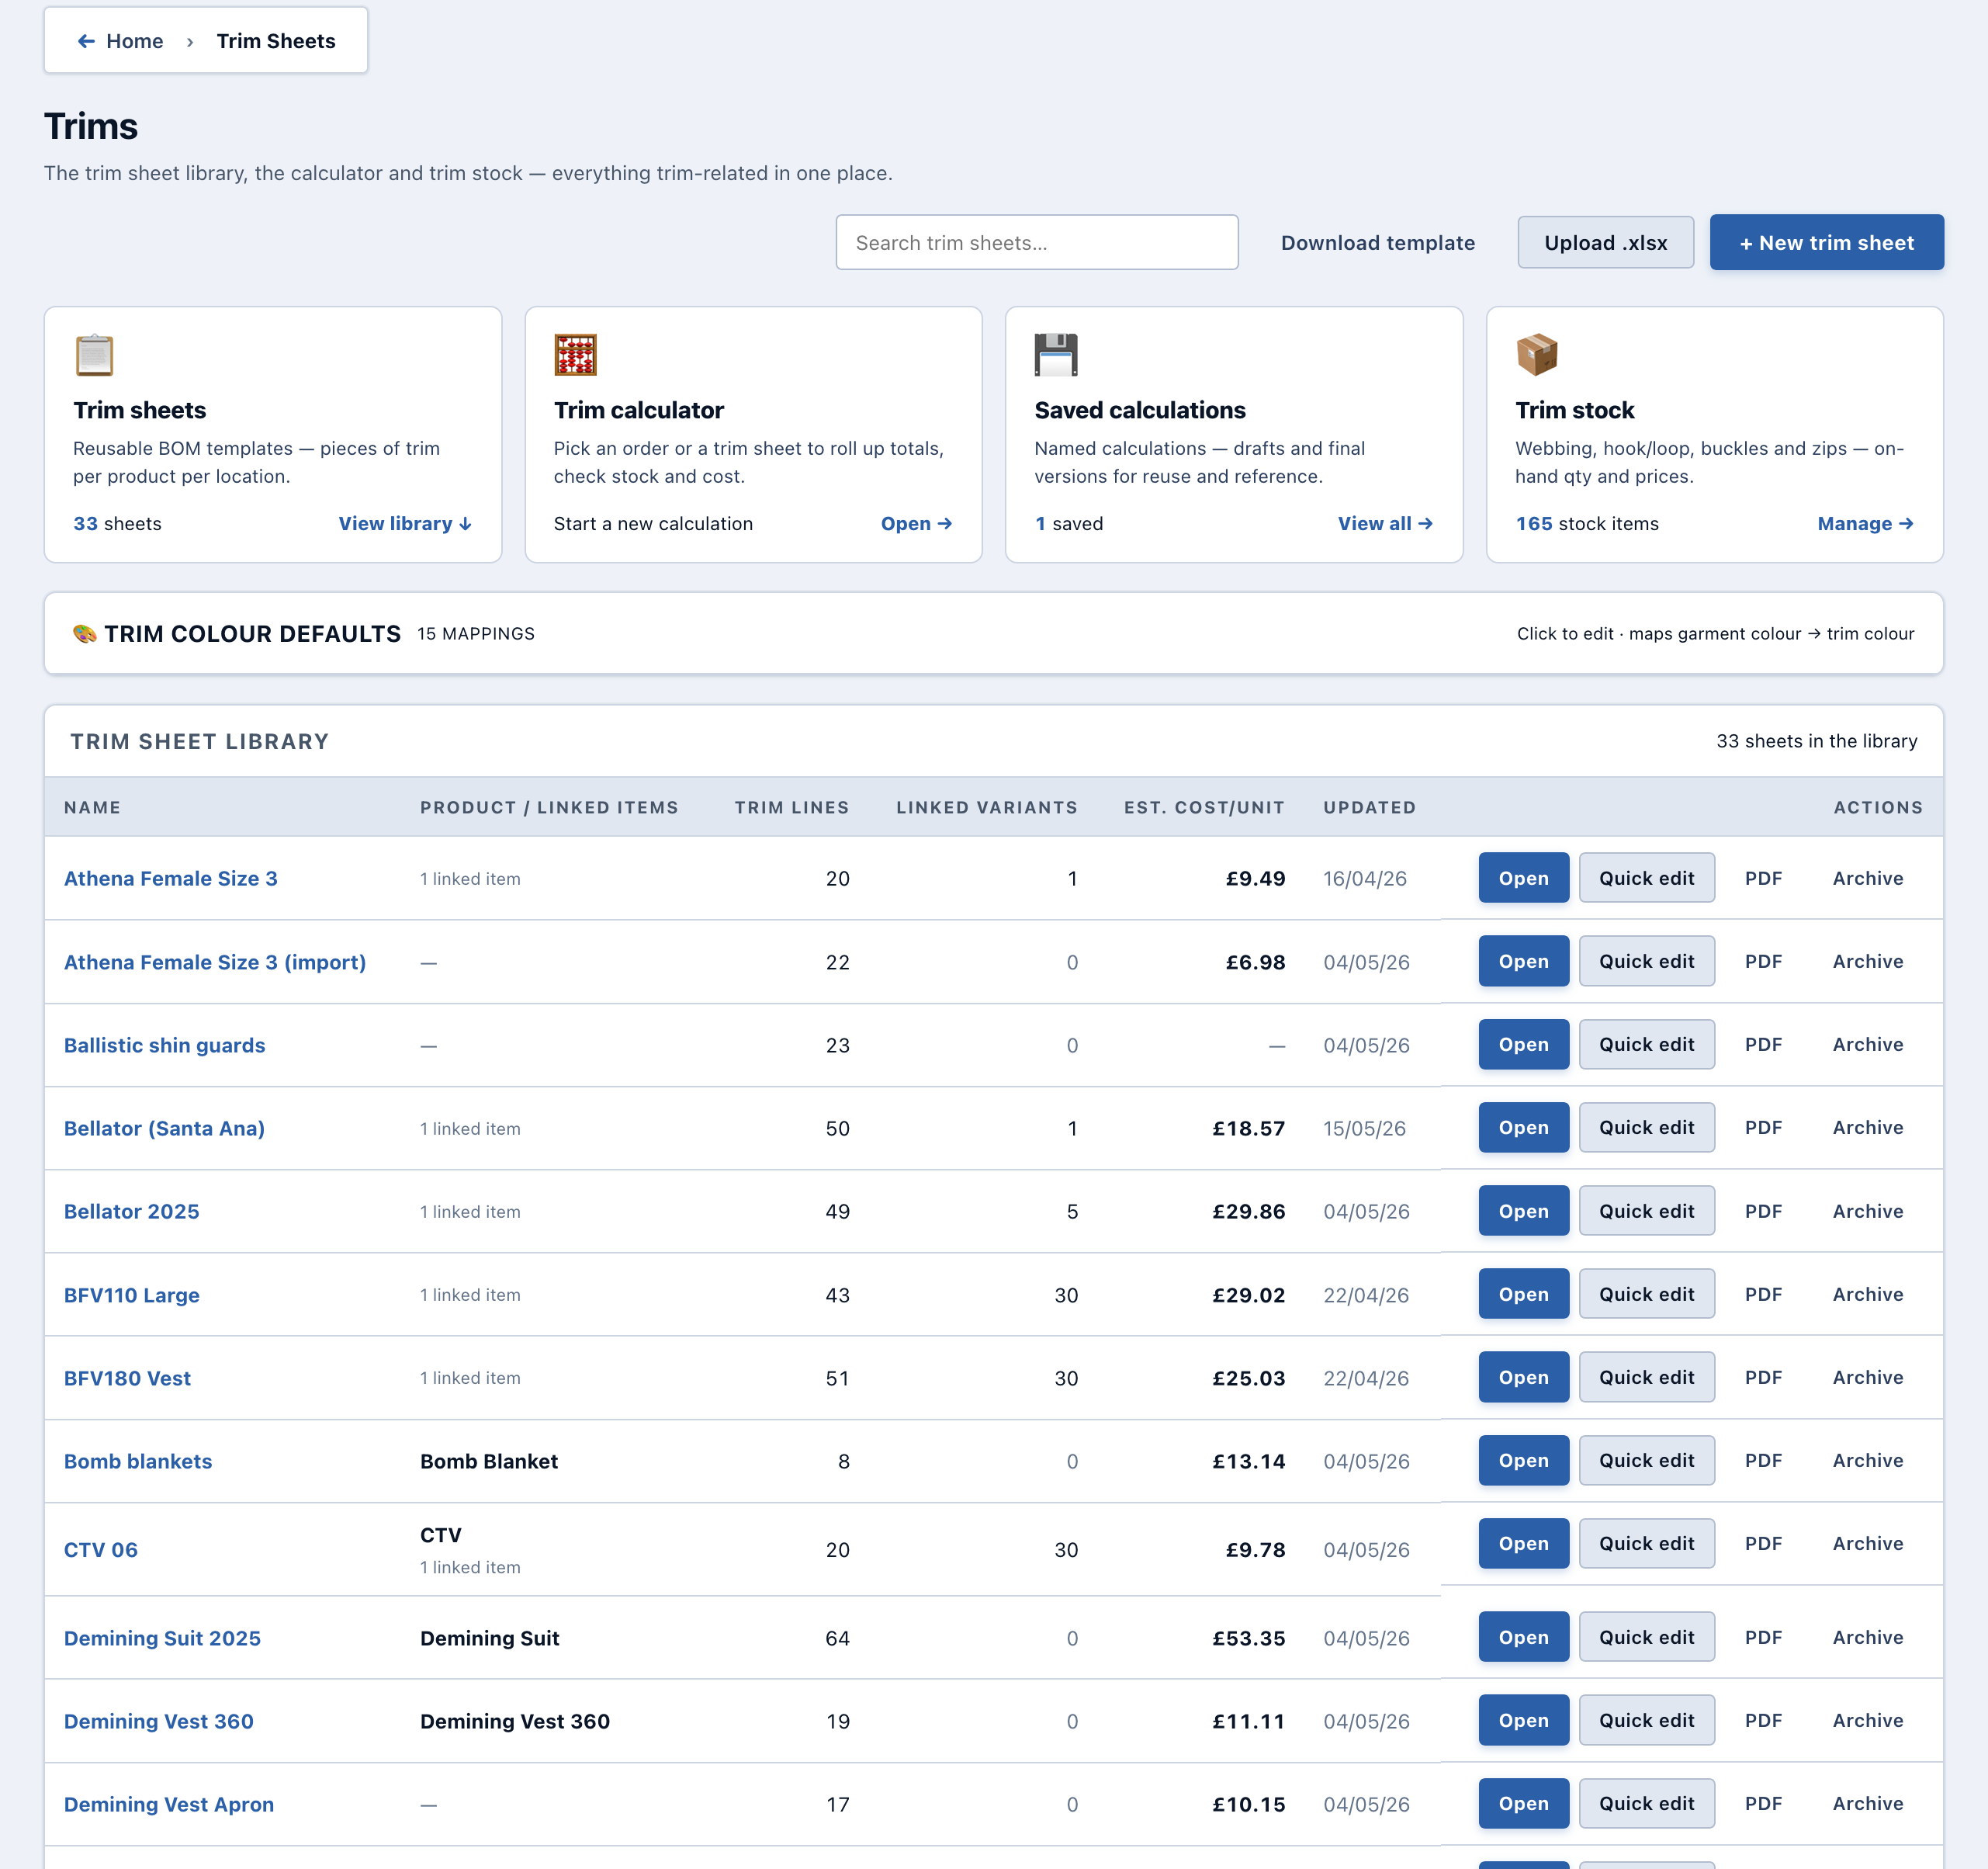
What this is for: a library of “this product needs these bits of trim” templates. Build a trim sheet once for, say, the Bellator carrier; every future order that uses a Bellator reads from the same sheet. Change a length or quantity on the sheet and every future calculation picks it up.
Each sheet is a list of trim lines with quantity-per-unit. Sheets are colour-agnostic — the colour gets applied at calc time via the colour mapping (see below) so one sheet covers every colour variant.
Creating a trim sheet
- Click + New trim sheet.
- Give it a name and optionally pick a product (this is metadata for filtering — see "Linked items" below for the actual linkage).
- Set the Sizes chips. New sheets default to Large; add more (e.g. Small, Medium, XL) and you'll get a Length column per size in the trim line table. Width / type / qty / notes are sheet-wide.
- Add location sections (Front Pocket, Back Inside, Cummerbund, etc.), then + Add trim per line — type, width, length(s), qty, notes.
- The ↳ Copy lengths from X → Y toolbar (visible when 2+ sizes) bulk-copies every length from one size to another, so you only have to tweak the trims that differ.
- Save. The sheet's PDF is available from the list page (Sewing Room or Table format).
Linked items
The Linked items card on each sheet has a + Edit linked items button: tick which catalogue items use this trim sheet, mark one as the primary. This drives the Carrier Job Sheet rollup + the new Trim Calculator. You can still link from the item side too — 🧵 Link sheets on a catalogue item profile.
Trim colour defaults
The first card on /trims.html is the garment-colour → trim-colour mapping table. Most rows are same-colour (Black vest → Black trim); the camo cases override (MTP / Multicam → Olive Green per the Sarkar convention). Add / edit rows then hit Save mapping. The Trim Calculator reads these defaults when auto-filling trim colour.
Trim Calculator /trim-calculator.html
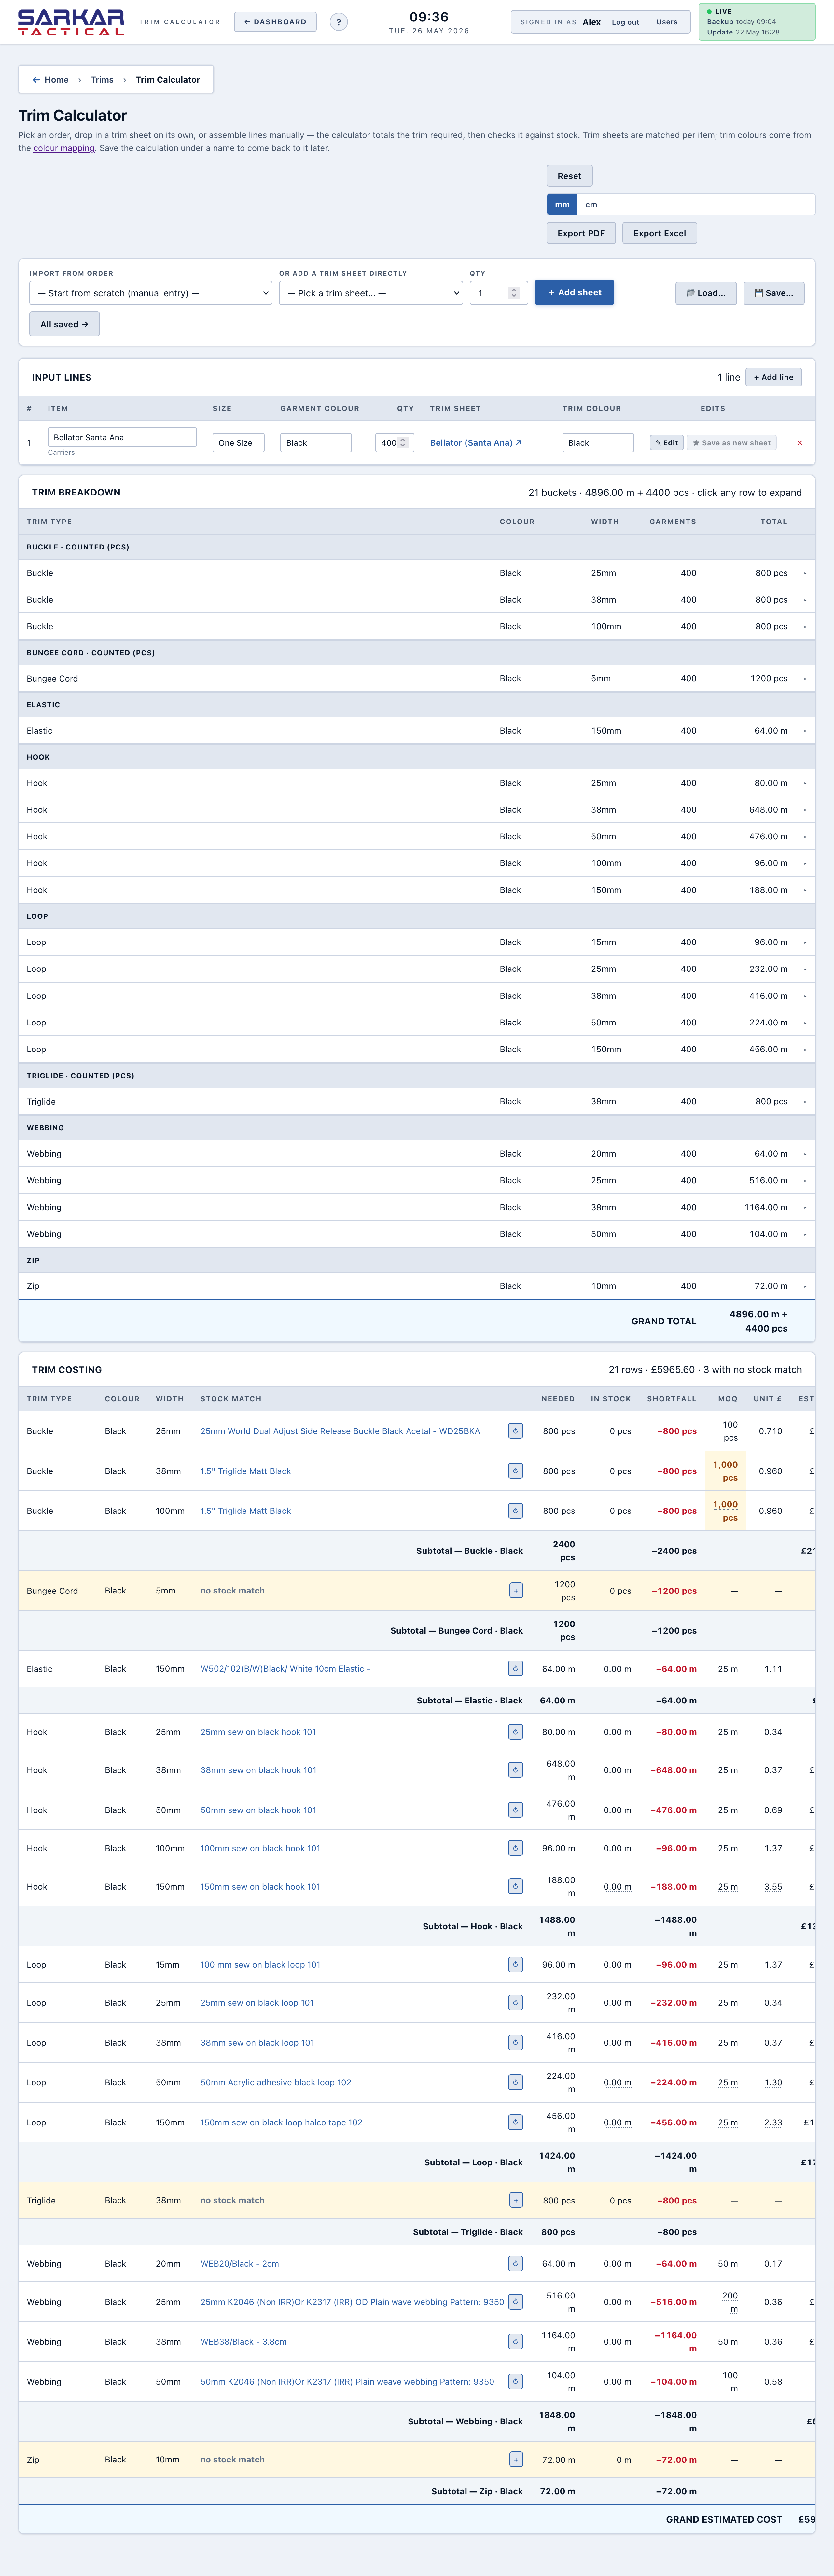
What this is for: answering “how much trim do I need for this whole order, and what does it cost?” in one screen. Pick an order (or build the line list manually), the calculator reads each item’s trim sheet, multiplies by quantity, and gives you totals plus a stock-availability check.
- Cost a whole order: pick the order from the “Import from order” dropdown → review the auto-imported lines → the breakdown + costing populate below.
- Cost just a trim sheet: pick a sheet in the “Or add a trim sheet directly” dropdown → type a qty → + Add sheet. No order needed.
- What-if the unit price was lower? click the price cell on any row → type a new value → the row re-costs immediately. The underlying trim-stock row is not changed.
- Save the calc for later: click 💾 Save… → name it → the URL becomes
?id=Nso a refresh or share keeps the state. - Open a saved calc: click 📂 Load… or browse all saved calculations.
Inputs
- Order picker in the toolbar — picking an order imports every line item as a calc row, copying item / size / colour / qty.
- + Add line for manual rows — datalist autocomplete from the catalogue.
- Each row resolves its trim sheet automatically (via the per-item linking) and its trim colour from the colour mapping. Both are inline-editable; the trim colour cell turns amber when hand-overridden.
Breakdown
One row per (trim type · width · trim colour · garment size) bucket. Length-based trims (Webbing, Loop, Hook, Elastic, Paracord, Fabric, Thread) show metres; count-based trims (Buckle, Button, Press Studs, Toggles, Label, Packaging) show pieces. Group headers separate trim types so you can scan "all my Webbing" in one block.
Per-line edits + Save as new sheet
Each input row has ✎ Edit — opens a modal showing every trim line in that calc line's sheet, with editable lengths pre-filled for the line's size. Edits stay temp on the calc line (the sheet itself isn't touched). ★ Save as new sheet clones the sheet with the overrides baked into lengthBySize for the calc line's size, so future calcs of the same item use the new spec.
Costing
The third card matches each breakdown bucket against /trims-stock.html by (type, width, colour) with a 4-tier fallback (exact → exact width → exact colour → any of type). Shows needed vs in stock vs shortfall vs unit price vs estimated cost. Rows with no stock match highlight amber.
PDF export
Export PDF generates a single document with three tables: source lines, breakdown, costing — plus headers showing total length, total cost, line count.
Limitations
- Costing assumes m-priced rolls for length-based trims and pcs-priced for count-based. If a stock row's unit doesn't match this assumption the cost will be off.
- Stock match picks the first matching row at each tier — if there are multiple suitable rolls, the cheapest isn't auto-picked. Edit the trim sheet to tighten the spec if this matters.
Fabric Recipes /pattern-sheets.html
Non-trim fabric consumption per product per size (Cordura, Mesh, Polycotton, Riverseal, Lining, Foam, …). Formerly called "Cutting Patterns" — renamed to reflect how it's used.
Creating / editing a recipe
- Click + New fabric recipe.
- Give it a name (by convention: "<Product> Fabric Recipe") and optionally pick a Product. The Product dropdown merges two sources:
- Rows from the legacy
production_productstable (tagged vest, carrier, etc.). - Every active catalogue item in Vests / Carriers / Demining / EOD / Clothing Other / Bags (tagged catalogue · Vests, etc.) — so items like BFV180, Krieger, or Athena that never existed in production_products still appear.
- Rows from the legacy
- Set the size list (defaults to XS / S / M / L / XL / 2XL / 3XL).
- Add one + line per material. Pick the material from the materials master; type qty per size.
- Save.
How recipes flow downstream
- Link a recipe to a catalogue item via 🧵 Link sheets.
- The Carrier Job Sheet reads the linked recipe; the per-line Materials column shows the material names (Cordura, Mesh) and the fabric rollup sums qty × line qty per material. Legacy
item_fabricdata is still honoured as a fallback if no recipe is linked. - The cost rollup on the item's Usage & cost card uses the recipe × materials.unit_price.
Product Formulas /product-formulas.html
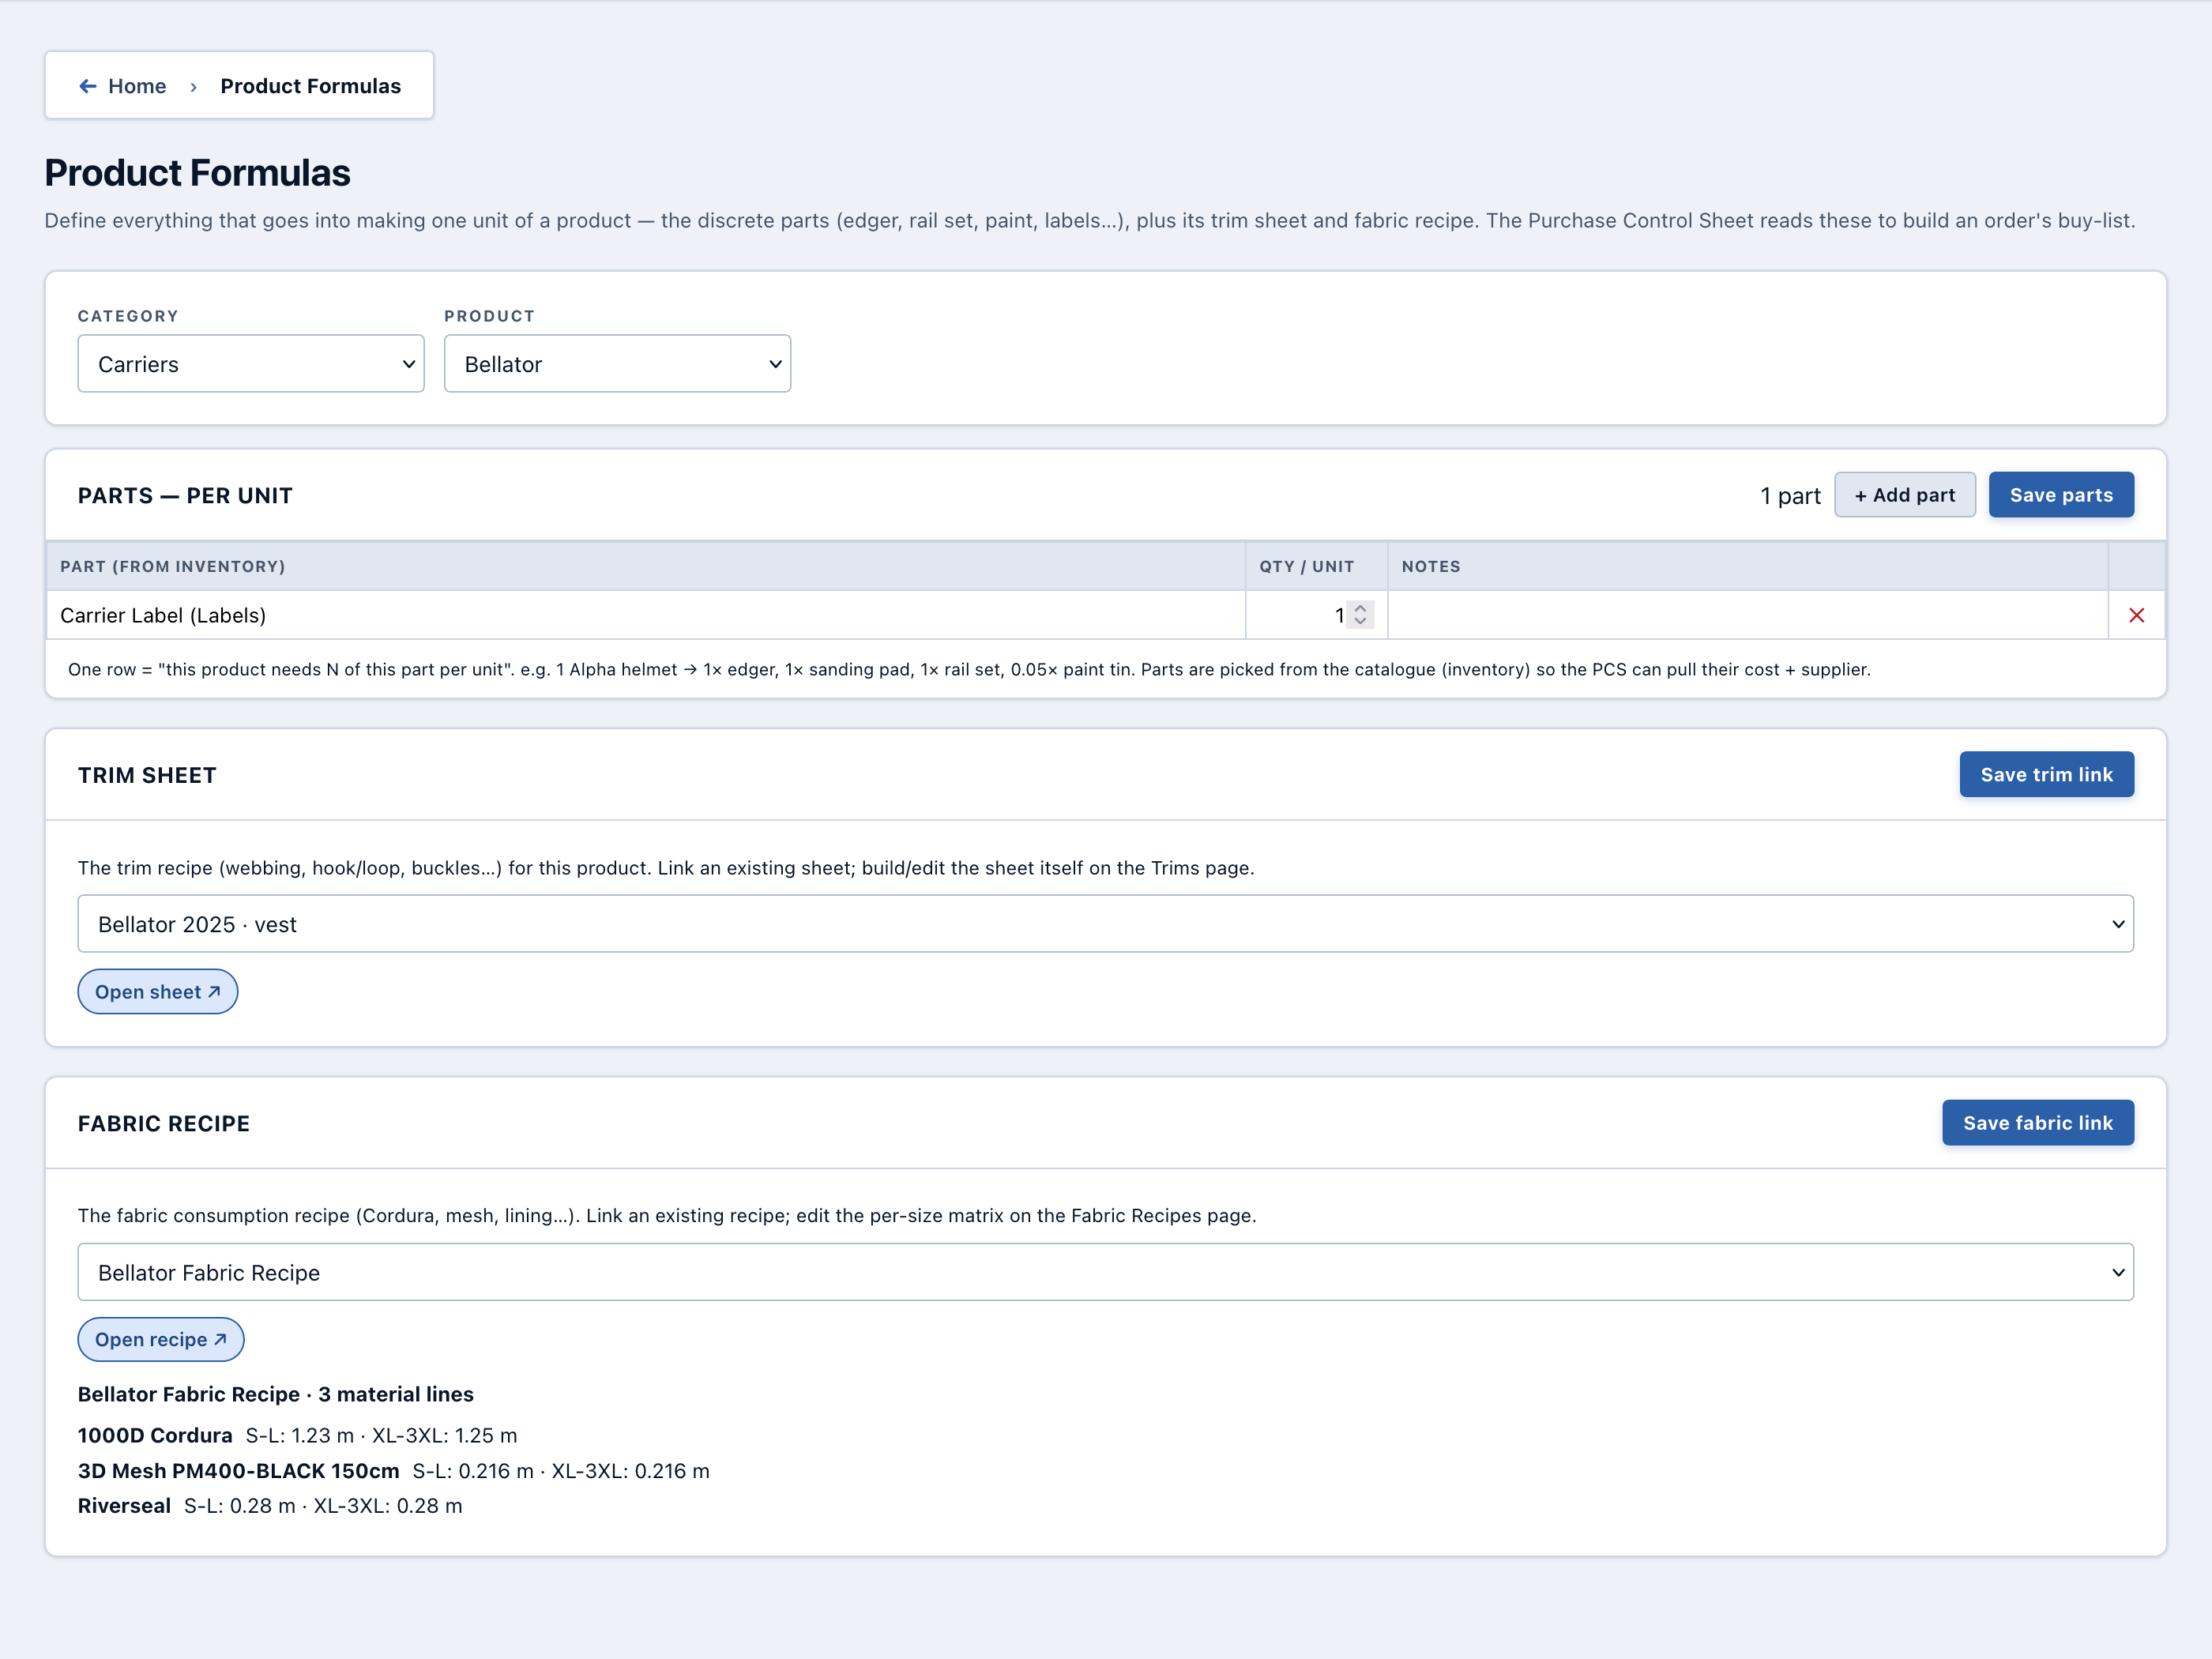
What this is for: a single page to set up “what makes this product” — the parts (BOM), the trim sheet, and the fabric recipe — without bouncing between Catalogue, Trim Sheets and Fabric Recipes. Once a product’s formula is set, the Trim Calculator, the Job Sheets, the PCS importer and the Usage & cost rollups all use it automatically.
- Set a product’s parts list: pick Category → Item → in the Parts section, click + Add part, pick the part from the catalogue, type qty per finished unit, Save.
- Link a trim sheet: in the Trim sheet section, choose from the dropdown of existing sheets and Save. Every order line using this item now reads from that sheet.
- Link a fabric recipe: in the Fabric recipe section, pick a pattern sheet from the dropdown and Save. The page shows a summary of the linked recipe (lines + qty by size).
The four sections
- Parts (Bill of Materials) — discrete components like buckles, pouches, plate covers. Reads from / writes to the
item_bomtable. - Trim sheet — the colour-agnostic trim template (lengths of webbing, hook, loop, bungee, etc.). Same dropdown as 🧵 Link sheets on the item profile.
- Fabric recipe — pattern-sheet linkage (Cordura, Mesh, Lining, etc., per size). Saving here updates
catalogue.pattern_sheet_idfor every active variant of the item. - Ballistic recipes — pick the preferred SAP / HAP layer stack for this item plus any number of alternates. The Ballistic Job Sheet auto-selects the preferred when an order line for this item is imported; alternates show as quick-swap options. Saves to
item_sap_solutions.
Ballistic Recipes /sap.html
The page is labelled "Ballistic Recipes" — it covers both SAP (soft armour panels) and HAP (hard armour plates). Seeded with the legacy configs plus the STANAG / PARAX / THOR-K families imported from the cost spreadsheet.
Layer stacks (variants)
Click any config to open its detail dialog. A config has one or more variants (e.g. "Standard", "Oversize"); each variant owns a layer stack:
- Click a variant's Edit or + Add variant.
- For each layer: material, quantity, strike-side flag (amber).
- ↑ / ↓ to reorder.
- Save — the stack is replaced atomically.
The variant editor exports a PDF with the full layer stack + stitching rows.
Items that use this recipe
Below the variants, each config's detail dialog now lists every vest/carrier profile that references this recipe in the Ballistic Costs table (CTV/UCV, Standard GPV, BFV110, Bellator, Krieger, Falcon, Demining Suit, …). Each profile name is a link to the catalogue item; next to it, the Edit button opens a per-size grid editor where you can tweak SQM, kg/sqm, kg/size, £/sqm, £/size, and labour minutes. The kg/size and £/size cells auto-compute from the per-sqm rates, but manual edits win (your typed value is preserved).
Ballistic costs
A dedicated data set imported from Ballistic Costs.xlsx: for every SAP recipe × product profile × size, the weight, surface area, unit rates and labour are captured. Lives in its own table (sap_item_cost) with 776 rows across 16 recipes and 32 profiles.
On a catalogue item
The Ballistic costs card on any ballistic item shows a table per applicable recipe. A control strip lets you:
- Filter to a specific size across all recipes (only sizes present in the data appear).
- Sort by recipe name, cost / size, weight / size, or SQM (asc / desc).
- Switch View between "Grouped by recipe" (one sub-table per recipe) and "Compare recipes" (flat table — great for picking the cheapest or lightest option).
- Search recipe names.
- Each recipe name is a link that opens that config's detail dialog on
/sap.htmlso you can jump to layer-stack edits in one click.
On a recipe
The Items that use this recipe list (see Ballistic Recipes above) shows all profiles tied to that recipe. Clicking the profile name opens the catalogue item; clicking Edit opens the per-size grid editor and writes back via POST /api/sap-item-cost/bulk.
Helmet Job Sheet /helmet-job-sheet.html
Builds a per-helmet assembly spec. Entries are rendered as cards; each card captures shell, size, colour, qty, pads, harness, NVG shroud, rails, bungee, top Velcro, Velcro dot (Halco Standard / Halco Acrylic / Velcro / None), accessories, thread lock, and comments.
Job header + order picker
The Job number field is a dropdown of existing orders. Pick an order and Customer / Invoice / Date issued / Notes auto-fill from its header. Pick "Enter a custom job number…" for ad-hoc sheets.
Helmet profiles
Save a full configuration as a named preset (e.g. "Leicester Police Fully Fitted"). Controls at the top of the "Add helmet entry" card, grouped into a ★ Profile pill:
- Profile dropdown — pick a saved preset; the form auto-fills the moment you click an option (no separate "Load" button). Empty fields the profile didn't set (Size, Qty, Helmet job number, Label serial, Batch details) glow amber to draw your eye to what still needs filling. The amber clears as you type.
- Save current — save the current form state as a new preset.
- Save & add helmet — save current as a profile AND push as an entry in one click.
Entry actions + drag-to-reorder
Each helmet card has a drag handle (⠿) plus three buttons:
- ✎ Edit — pops the entry's values back into the form and removes it from the list. Re-save with + Add helmet.
- ⧉ Duplicate — clones the entry below. Serial, batch, and helmet job # are cleared on the duplicate so the new row gets a fresh serial.
- ✕ Remove.
Drag a card onto another to reorder. Auto-assigned serials re-number to match the new order — that's how you choose which serial goes where.
Auto-generated serials
When a Job Number is set, every entry's serial is assigned automatically in the format {jobRef}.{yyww}-HEL-{NNN} where the jobRef has dashes stripped ("G26-019" → "G26019") and yyww is ISO year-week of the Issued date. The sequence is a cumulative running count: entry 1 qty 1 → 001, entry 2 qty 10 → 002–011, entry 3 qty 1 → 012, matching the legacy Job Sheet & Labels format.
The card shows the serial with an (auto) tag. If you type into the Serial field on the form, that entry locks to your value (no renumber on reorder). Blank Job Number = blank serials (fill in later).
PDF output
Top-right toolbar: Download Stock List + Preview & download PDFs. Send to Order has been moved to a big green CTA at the bottom of the page (under the Helmet Entries list) — natural eye-line after the entries are done. The CTA shows the picked job ref next to its label; pick an order in the Job header to enable it.
- Download Job Sheet — matches the HJS-G26-019-Factory template. Centered title, 2-column meta grid, thread-lock checkbox, a transposed table with one column per helmet style (Style A / B / C …) and rows for every attribute including Serial Range. Drops empty rows automatically. Switches to landscape for >4 styles. No signed-by block.
- Download Stock List — matches the SL-G26-019 template. Configurations table (Shell, Size, Colour) with tick-off column, then Accessories & Components grouped by category.
Carrier Job Sheet /carrier-job-sheet.html
Per-order fabric + trim rollup for Vests / Carriers / Demining items. Pick an order from the dropdown and the page auto-loads all relevant lines.
Line layout
Each line is laid out in six columns: Item / Size / Colour / Qty / Patterns / ✕. Size and Colour are datalist-backed text inputs — you can pick from catalogue suggestions or type a free value (useful for one-off customer sizes).
- Patterns shows both the Fabric recipe (linked fabric recipe on the catalogue variant) and the Trim Sheet (linked trim sheet). Both labels are explicit so you always know which one is missing.
- Size uplift % — when a size isn't listed on the fabric recipe, the page extrapolates from the nearest listed size using an uplift percentage that's set per-item (default +4 % per step up from Large). Lets a single recipe cover Small → 3X-Large without a full matrix.
- Inline recipe linker — if the variant (e.g. CTV 3X-Large) has no recipe favourited, the Patterns cell shows a dropdown. Pick a recipe and the system writes it to every variant under that item in one call, so 2X-Large / 3X-Large / out-of-matrix sizes inherit it immediately.
Recipe matching fallback
Three-tier fallback when resolving a line's recipe: exact (item + size + colour) → item + size → item. Rows with a linked pattern_sheet_id are preferred over unlinked duplicates (fixes the old "fabric recipe not linked" symptom on 2X-Large/3X-Large variants).
Composition & Batch & Lot
A per-sheet Composition block (Manufacturer, Material, Orientation, Layers, Stitch description, Stitch location, Stitch thread, Stitch layers) lets you capture construction notes that print on the PDF. The Issued section is a compact 4-column table (Date / Qty / Width / By) rather than the old textblock.
Rollups & preview
Below the lines: three rollups — Fabric (by material), Trim (by type/width/colour), Per-line breakdown.
Top buttons: Preview & download PDF opens a full WYSIWYG preview where you can override Materials / Patterns / Batch & Lot / Notes before exporting. Send to Order attaches the generated PDF to the order.
Material override + Save as new fabric recipe
Each line has an expandable Materials for this line panel showing every material the recipe specifies. Each row has a dropdown listing every material in stock (grouped by Fabric / Ballistic / Other, with stock-on-hand badged inline). Pick a substitute and the line's Construction string + the rolled-up Materials list update everywhere. Swapped lines turn amber and show a "swapped" pill. ★ Save as new fabric recipe clones the recipe with the swapped materials baked in, prompts for a name, and re-points every active variant of this item at the new recipe so the swap is the new default.
Sign-off block
The PDF sign-off table is now two rows: Issued by (auto-fills with the signed-in user's name + the issued date) and Received by (blank line for a pen signature). Same applies to the on-page preview.
Ballistic Job Sheet /ballistic-job-sheet.html
Ballistic material rollup across an order's ballistic lines. Pick an order; it imports lines flagged "Inc ballistics".
Line layout
- Item / Size / Colour / Qty / Panel (F / B / F&B). Size and Colour are datalist inputs scoped to the category's colour palette.
- SAP recipe — auto-linked from the item's favourite when available, fall back to the three-tier match (item + size → item). When a recipe is picked manually and the item had no favourite, an Apply recipe to all N other lines button appears so you don't have to set it one line at a time.
- sqm — auto-computed using the catalogue item's
ballistic_front_sqm+ballistic_back_sqm(summed per panel choice), or falls back tosap_sqm_per_layer × panel count. Manual override per line.
PDF structure
The PDF has been reorganised for factory handover:
- Columns renamed: Specification → Specifications, Item → #, Model → Item, Recipe → Construction.
- Per-recipe sections headed "SAP {name} — Construction" / "SAP {name} — Stitching".
- Material Usage and Batch & Lot have been merged into a single Batch & Lot table with columns: Material / In stock / Theoretical / Actual / Final / Batch # / Lot # / Other. One table, the cutting room and the QC signer read the same row.
Top buttons: Preview & download PDF (editable preview with Notes override) and Send to Order.
Commercial Invoice & Packing List (CIPL) /cipl.html
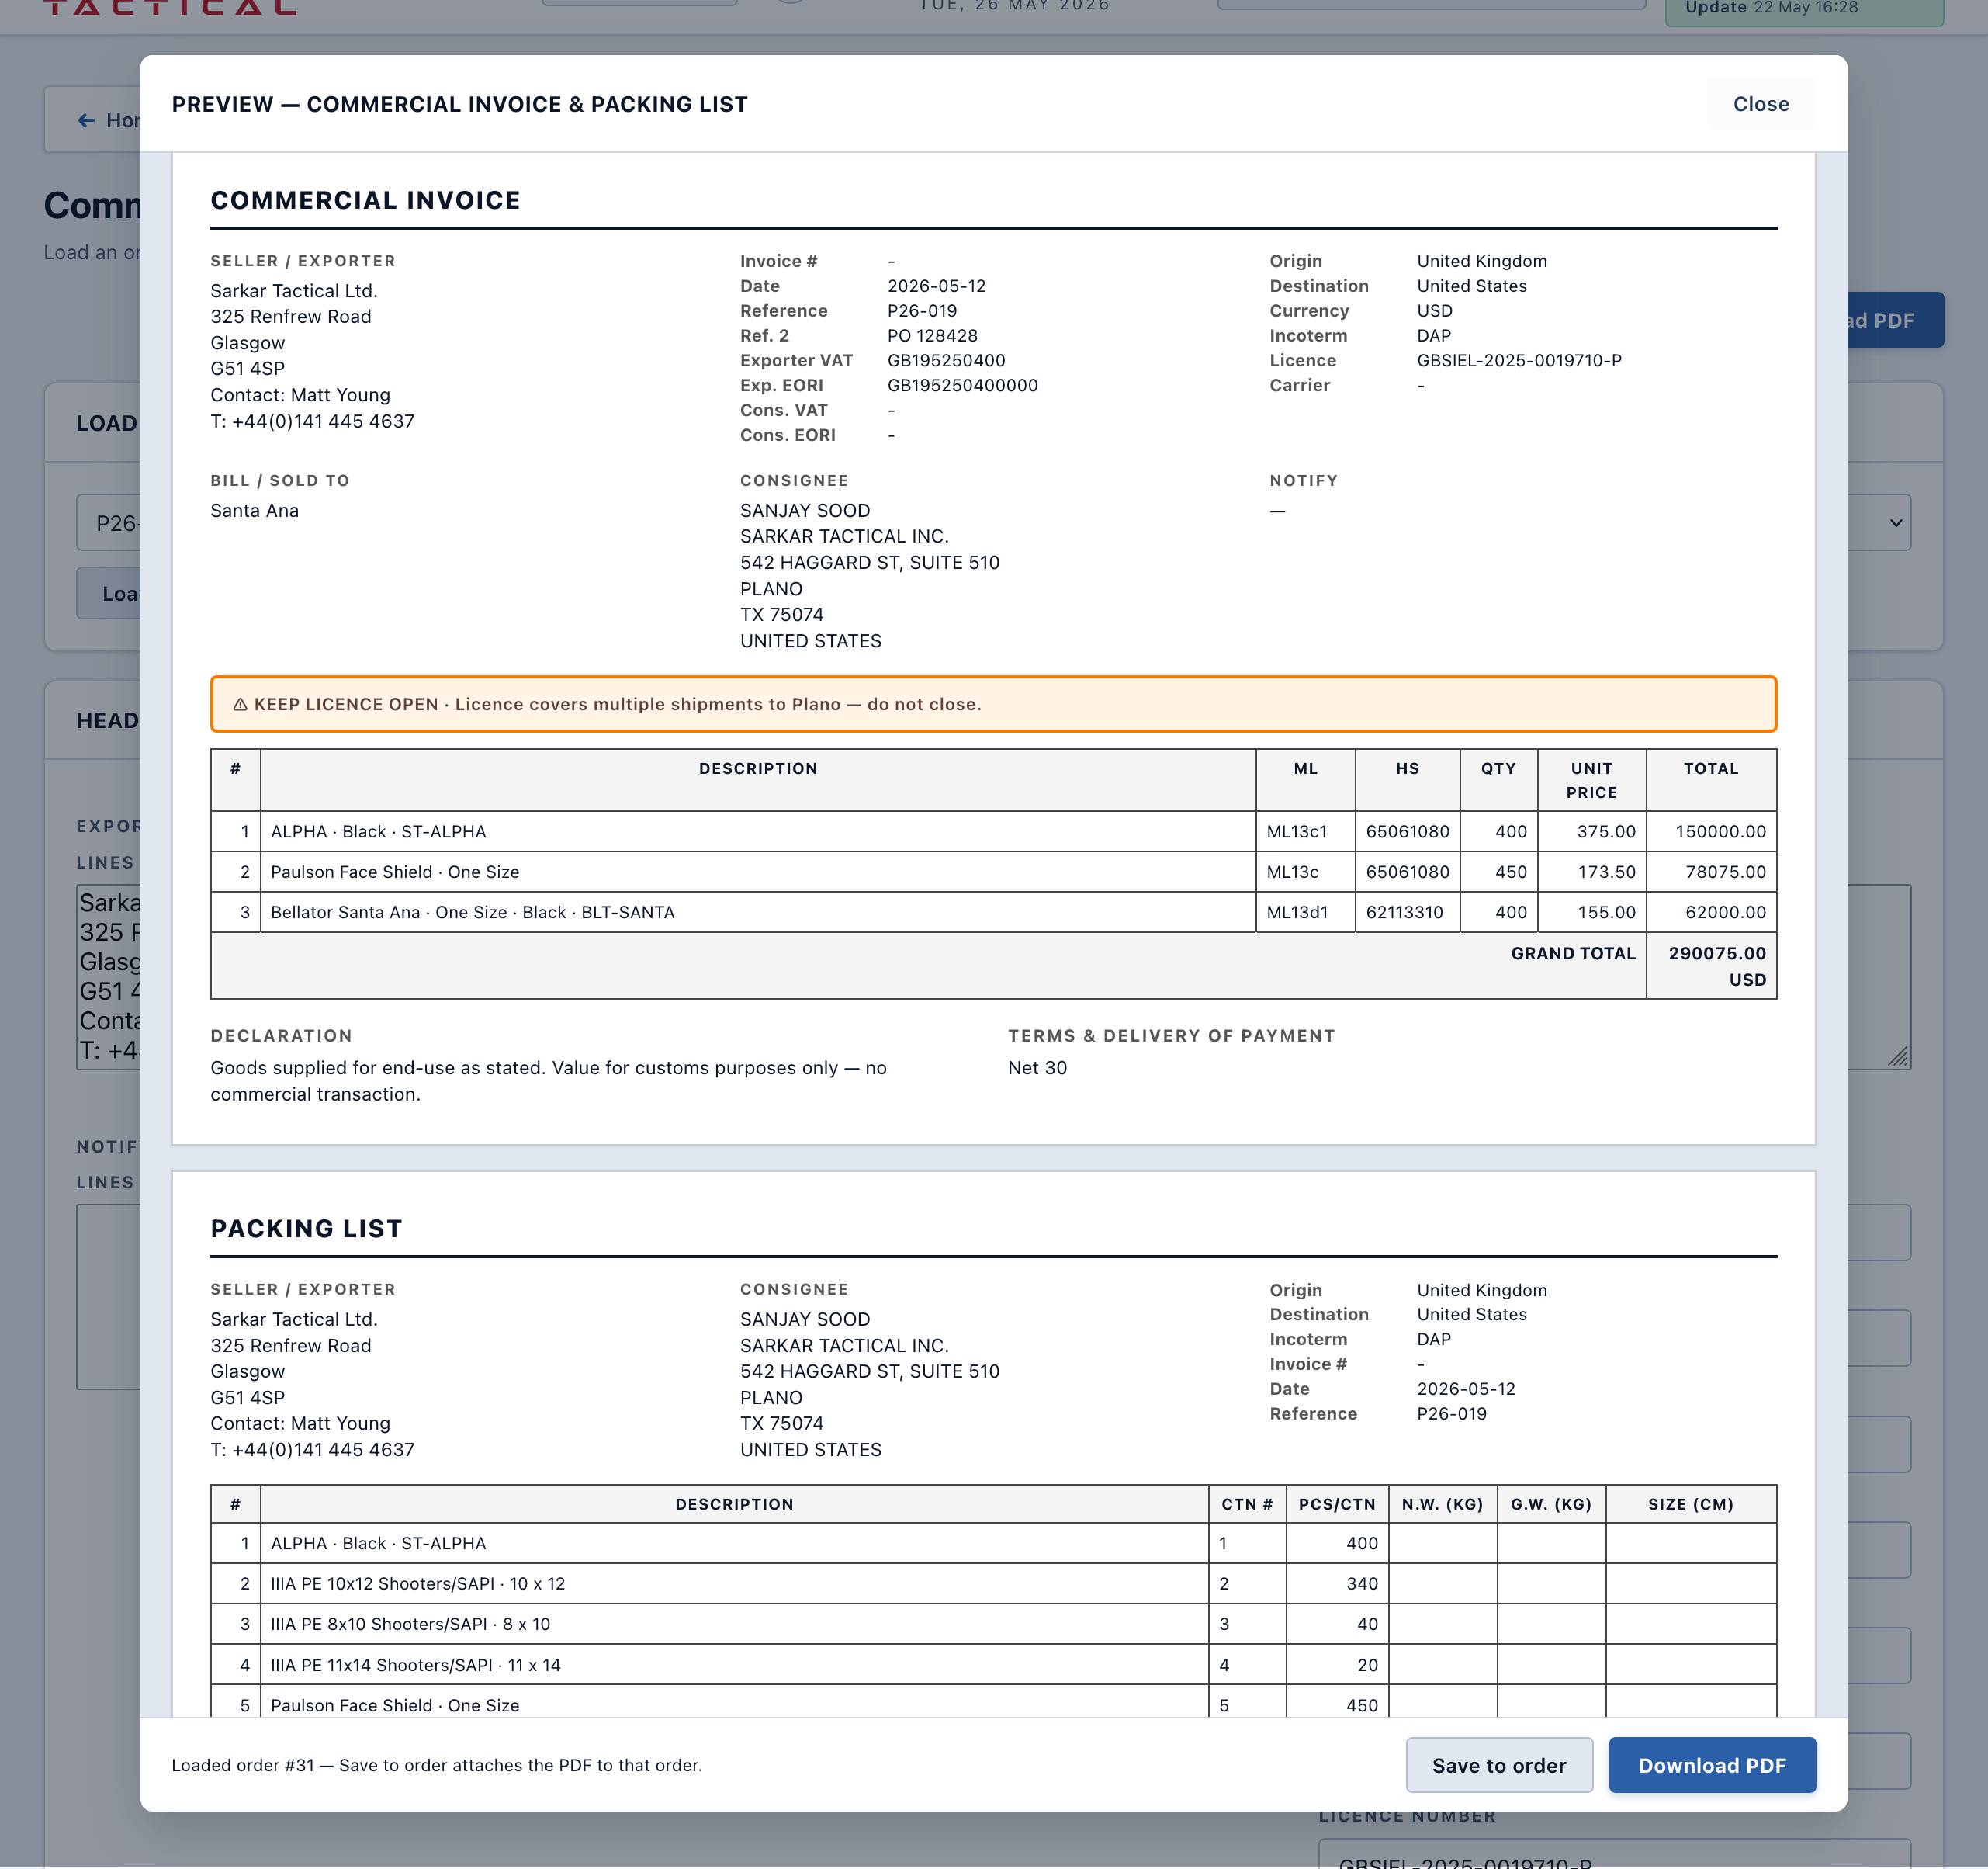
What this is for: the two-page export document that ships with every international order — page 1 is the commercial invoice (what’s being sold and for how much), page 2 is the packing list (how it’s boxed up). Pick the order, the system fills in the items, prices, ML ratings, HS codes and licence number automatically. You preview the two pages on screen, tweak anything that needs it, and download the PDF.
- Generate the CIPL for an order: pick the order in the dropdown — the page hydrates immediately. Scroll the on-screen preview, fix anything obvious, click Preview & download PDFs.
- Override a line: click any cell on the items table (description, ML, HS, qty, unit price) to edit. Overrides stick for the session and end up in the PDF.
- Plano shipment: tick Ship to Plano on the order before opening the CIPL — the consignee block auto-fills with Sanjay’s address and the licensed-product naming kicks in.
- Custom item shipped under the licence: map the item on Item ↔ Licence mappings first — the CIPL will then describe it as the licensed family on output.
Auto-fill from the order
Pick an order from the dropdown — the page loads immediately (no "Load order" click needed). It fetches the full catalogue in parallel and hydrates each line with:
- ML rating, HS code, Unit price, Item code — looked up from the catalogue variant matching (category + item + size + colour).
- Licence number — from the order's Licence number field (see Orders).
- Consignee — if the order is ticked "Ship to Plano (Sanjay's office)", the consignee block is overridden with the Plano address automatically.
Override any field inline; overrides stick for the session.
Preview & download
Preview & download PDFs opens a two-page WYSIWYG modal. You can edit consignee, banking details, line prices, and notes before exporting.
Serial Numbers /serials.html
What this is for: the unique ID that goes on every finished item so you can trace exactly which order it shipped on, when, and to whom. The system generates one serial per piece automatically when the job sheet is built — you almost never type these by hand.
All serial numbers allocated for helmets, vests, SAPs, HAPs, and any custom pool types live on this page.
Format
{jobRef}.{yyww}-{CODE}-{NNN}
Example: G26-029.2615-CAR-001
- jobRef — from the order, dashes stripped (
G26-030→G26030). - yyww — ISO year-week (2615 = week 15 of 2026).
- CODE — HEL (helmet), CAR (vest carrier), SAP (soft armour), HAP (hard armour), or any custom type you've defined.
- NNN — zero-padded cumulative sequence, unique within its {jobRef, yyww, code} combination. Entry 1 qty 1 → 001; entry 2 qty 10 → 002–011; entry 3 qty 1 → 012.
Manage pool types
Click ⚙️ Manage types at the top of the page to open the pool type manager. Full CRUD — add, rename, or disable types. Use this for anything beyond the four defaults, e.g. DET (metal detectors), PLT (plate carriers shipped standalone), etc. New types become available immediately in the Allocate dialog and on every job sheet.
Allocating
Most allocation happens automatically from the Production Specs page (Helmet / Vest / SAP specs have an Allocate serials button). You can also allocate manually here via + Allocate serials, or insert a completely custom value with the + Custom serial button (useful for pre-numbered hardware where the supplier's serial is the one of record).
Drag to reorder
Cards in the allocation list are draggable. Drop one onto another to reorder. Auto-assigned serials renumber to match the new order — drag the cards to decide which physical unit gets which serial. If you type a value directly into a card's serial field it locks and won't renumber on reorder.
Regenerating after a change
If line quantities change mid-flight and you need to re-allocate cleanly, the page purges by jobRef pattern (not just by order_id) so orphan serials left over from previous renumbering don't skew the count. Result: starting fresh on G26-030 always begins at 001, not 007.
Labels grid /labels.html
What this is for: keeping track of which labels (warning labels, ML rating, serial stickers, batch tags) have been printed for which order. One grid that replaces the old whiteboard — tick a cell when the label’s been printed, untick if you need to reprint.
One source of truth, tracked per order × per label-kind.
Grid structure
Three-level column header:
- Order (first column) — job ref + customer.
- SEW ON ribbon → CAR Paper (carrier paper labels).
- STICK ON ribbon → two sub-ribbons:
- BIG Labels → HAP, BIG SAP.
- SMALL Labels → HEL, HEL w/ Visor, SMALL SAP.
Each cell shows the allocation info for that order × category, with a small ✓ tick-button in the top right — one click marks the cell as printed (no dialog).
Classification
Each serial allocation is classified into one of the six label categories by looking at:
- its per-allocation label category override (if set manually);
- its pool (HEL → helmet categories; SAP → SAP categories; CAR → CAR Paper; HAP → HAP);
- keywords in the assigned-to field (e.g. "visor" routes to HEL w/ Visor).
Batch actions & exports
- ✓ ALL PRINTED — marks every visible cell as printed, respecting any filters you have on.
- PDF · Print queue — exports every unprinted cell as a to-do list for the print room.
- PDF · Printed log — exports every printed cell as a post-run record.
Editable popup
Click a cell to open an editor: set the label category override, re-assign-to, or adjust the label repetition per allocation. You can also insert a raw custom serial here (bypassing the auto-format) for re-prints.
Quick-allocate from an empty cell
For pool-backed cells (CAR / HAP / SAP / HEL) the cell dialog has a green ⚡ Quick allocate panel: type a count, an optional assigned-to label, hit the button — N sequential serials are minted under the order's job ref and pinned into THIS cell. No need to detour through the ballistic job sheet just to add SAPs to an order that didn't auto-pair them.
Clickable order ref
The order ref in the leftmost column is now a link straight to that order's edit page — saves copy-pasting refs into the URL bar when jumping between labels and the order itself.
Deep-link query params
The order page's Labels card uses these to drive the labels grid:
?orders=<ref>— pre-fills the search filter so the grid lands scoped to that order.?orders=<ref>&edit=<catKey>— also auto-opens the cell dialog for that order × category. Used by the per-row ✎ Edit on the order Labels card.?orders=<ref>&export=queue— also auto-triggers the print-queue PDF export. Used by the order page's "📄 Print labels PDF" link.
Data Audit /data-audit.html
One-stop list of what's still missing across the catalogue before trusting auto-generated sheets and costings. Flags: HS code, ML rating, net weight, sales price, photos, BOM, SAP recipe link, trim sheet link, fabric recipe link, ballistic sqm — anything that feeds downstream automation.
Click any row to jump to that item's detail page and fix it. The audit updates live as you edit.
Backups & data
Where is the data?
Everything is stored on the Dell in two places:
- MySQL database (
sarkar_stock) — all structured data: stock, orders, catalogue, suppliers, production specs, serials, everything. - File system (
backend/uploads/item-images/) — all uploaded photos.
How to back up manually
Click the Export ZIP button in the Stock Manager header (top right). Downloads a file called sarkar_stock_backup_YYYY-MM-DDT…zip containing:
manifest.json— row counts per table.database/sarkar_stock.sql— full MySQL dump.database/*.json— human-readable JSON dump of every table.images/— every uploaded photo organised by category/item.
Automatic backups on the Dell
A script at /home/sarkarserver/backup-db.sh runs every hour via cron and keeps a rolling archive:
- 48 hourly backups — the most recent 48 hours at hourly granularity.
- 14 daily backups — one per day for the last two weeks.
- 12 monthly backups — one per month for the last year.
Files go to the USB drive plugged into the Dell (so a database crash doesn't take the backups with it). The status pill in the header shows the timestamp of the most recent successful backup — green if fresh, amber if stale.
Hosting & public URL
The backend runs on the office Dell (LAN address 192.168.1.31:3001). To let people use it from outside the office, a Cloudflare Quick Tunnel proxies a public HTTPS URL to the Dell. No domain purchase, no port forwarding, no router config — entirely free.
How it works
cloudflaredruns in a tmux session on the Dell and publisheslocalhost:3001to a Cloudflare-issued*.trycloudflare.comURL.- A
@rebootcrontab entry re-launches the tunnel whenever the Dell restarts, so the public URL is always live. - The URL rotates each time the tunnel restarts (this is a Quick Tunnel limitation — see below). Current URL is pinned in the project notes.
Security caveats
The public tunnel exposes the whole app to anyone who knows the URL. Protection sits at the application layer:
- PIN-based sign-in with signed HttpOnly cookies.
- Role-based allowlists on sensitive pages (admin-only destructive actions).
- Currently client-side gating only — a future upgrade (on the roadmap) is server-side role enforcement so a crafted HTTP request can't bypass the UI.
If the site is unreachable
- Check the tunnel is alive:
sshto the Dell andtmux ls— a session namedcloudflaredshould exist. - If not, restart:
tmux new-session -d -s cloudflared '~/bin/cloudflared tunnel --url http://localhost:3001'. - Read the new URL from the tmux output and share it with the team.
Tips & shortcuts
- Sign in with your own PIN. Don't share a PIN — every record is tagged with who was signed in. Sharing breaks the audit trail.
- Use search everywhere. Every list page has a search box. Type part of the name — you usually don't need to scroll.
- Drafts are cheap. Create an order draft as soon as you know a job is coming. You don't burn a job ref until you finalise.
- Number fields no longer change on scroll. You can scroll past a qty or price field without the value getting bumped — this used to silently corrupt data.
- Size / Colour are text inputs with suggestions. Pick from the dropdown for common values, or type a free value for one-offs (custom customer size, special colour).
- Drag & drop photos onto the catalogue-item Photos card. Up to 12 per drop.
- Click a photo to open the lightbox viewer (← → to step, Esc to close, 🗑 twice to delete).
- Use Copy / Merge to fold imported duplicates into your existing items without losing HS codes or supplier links.
- Use tags liberally on suppliers. One supplier can have many tags. Tag at creation — adding later is a chore.
- Serials auto-assign once you pick a Job Number. Drag cards to decide which physical unit gets which serial. Type directly into a serial field to lock that card.
- Order attachments accept uploads, not just generated sheets. Scanned customer PO, signed spec, supplier confirmations — drop them on the order so they're always in one place.
- Preview before export. Every job sheet (Helmet / Carrier / Ballistic) and the CIPL now have a Preview dialog. Edit notes / materials / prices in the preview, then export the final PDF.
- Use the Data Audit page before generating sheets. Every missing field it flags is one that could break a downstream rollup or PDF.
- Status pill — green OK, amber = backup stale, red = database down. Check it first if something isn't saving.
Troubleshooting
"Could not reach the stock server"
The frontend can't talk to the backend. Usually one of:
- The Dell is off or rebooting. Wait a minute and try again.
- The
sarkar-stockservice crashed. SSH to the Dell and runsudo systemctl restart sarkar-stock. - You're using the public URL and the Cloudflare tunnel has cycled. See the Hosting section for the restart steps — the new URL needs to be shared out once it's up.
- Your laptop is on a different network than the Dell (for LAN access).
Public URL suddenly doesn't work
The Quick Tunnel URL rotates when cloudflared restarts (e.g. Dell reboot). The @reboot crontab brings it back up, but the URL will be different. Check with the admin for the current URL.
Serial numbers started at 007 instead of 001
This used to happen after re-allocating a job — orphan serials were left in the database with the same jobRef, so the counter skipped past them. Fixed in Apr 2026: regeneration now purges by jobRef pattern before re-allocating, so you always start at 001.
"Fabric recipe not linked" on 2X-Large / 3X-Large
The large-size variant has no pattern sheet linked. Two options: (a) use the Carrier Job Sheet's inline recipe linker to attach one in a single click, or (b) open the catalogue item and link it directly. The job sheet resolution now prefers linked variants, so duplicates won't cause the old false-negative.
The page looks broken / stuck on "Loading…"
Usually a stale cached script. Hard refresh: Cmd+Shift+R on Mac, Ctrl+Shift+R on Windows.
A form won't save and shows an error
Read the error message — it usually tells you what's missing (e.g. "name is required"). If the error is something cryptic like "Illegal mix of collations", that's a database schema issue and needs the admin.
A photo upload failed
Check the file size (must be ≤ 15 MB for images) and type (must be an actual image file). Max 12 files per upload to the photo gallery. For PDFs / Word / Excel docs on an order, use + Upload file in the order's attachments card — that path accepts up to 30 MB.
I accidentally deleted something important
Most "delete" buttons are soft deletes (is_active = 0). The data is still there. Exceptions: the Customer Delete button attempts a hard delete first (falling back to archive if FK-blocked), and the hard-delete option on Supplier / Material merges genuinely removes the source row. For recovery, restore from the most recent nightly backup ZIP.
A job ref got allocated to the wrong order
Job refs are never recycled, but you can cancel the order and create a new one. The "wrong" order becomes a historical cancelled record. Don't manually renumber things — it breaks audit trails.